HubSpot is a powerful CRM system which integrates with Magento via an open-source extension. The HubSpot integration takes information from Magento and syncs it to HubSpot, which can help you increase online sales from new customers and existing customers. By using HubSpot’s workflow administration tools, you can create webhooks that synch your data when and how your organization needs it.
We are going to work backwards here and setup the endpoint on Magento’s side first. Attached is the scaffolding for a Magento module that will allow you to accept incoming webhook requests into Magento. A HubSpot webhook will essentially make one single request to a URL of your choice. The purpose of this module is to setup a controller on Magento’s side that can listen for the incoming request, validate the signature of the webhook request, and then parse the incoming payload about the Contact’s information from HubSpot. This process flow shows the high level steps we’ll be following to perform the webhook setup.
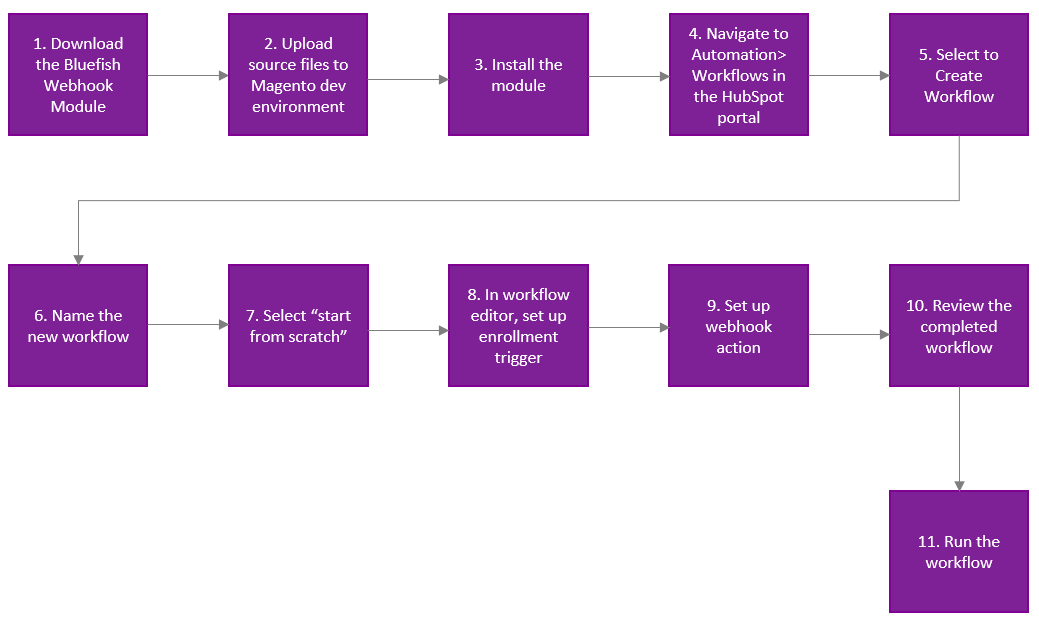
Step 1 – Download the Bluefish HubSpot webhook using this link:
Step 2 – Upload the source files to your publicly accessible Magento development environment.
Step 3 – Then run “bin/magento module:enable BlueFish_HubSpotWebhook” and the other various setup commands to complete the installation of the module.
In the code, the most important file is this: app/code/BlueFish/HubSpotWebhook/Controller/Contact/Webhook.php
The \BlueFish\HubSpotWebhook\Controller\Contact\Webhook::execute() method is where you are going to want to create whatever logic you want your webhook to do. All of the scaffolding is there to accept the webhook via a controller, authenticate the request signature on the incoming request, and parse the data being received by HubSpot.
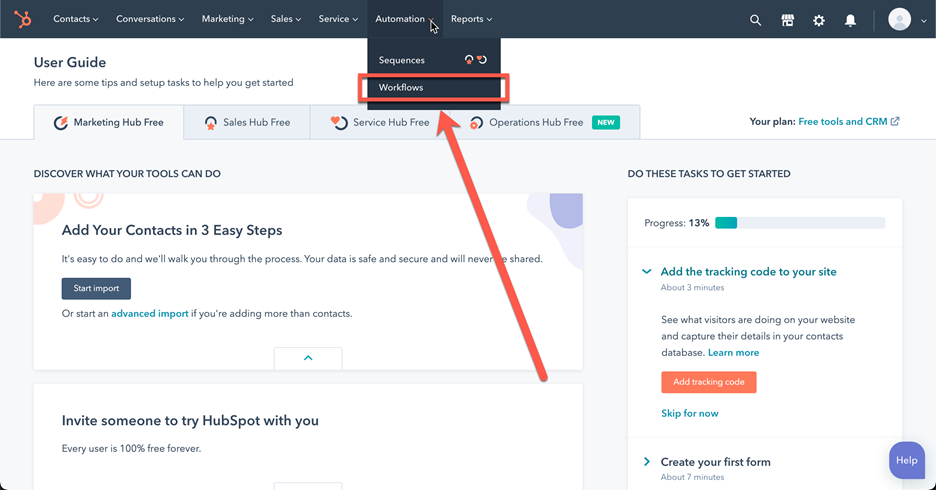
Step 4 – After logging into your HubSpot CRM portal, navigate using the top menu to locate Automation > Workflows.
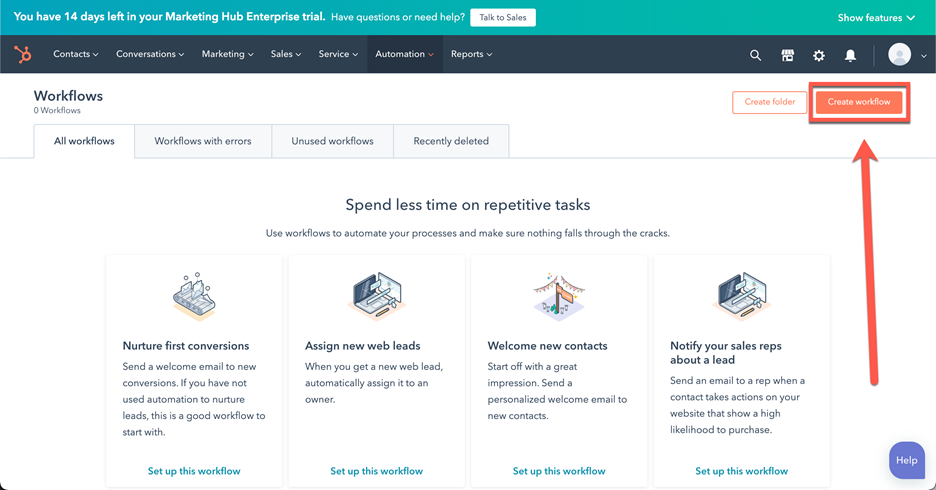
Step 5 – Click on Create workflow at the top right of the screen.
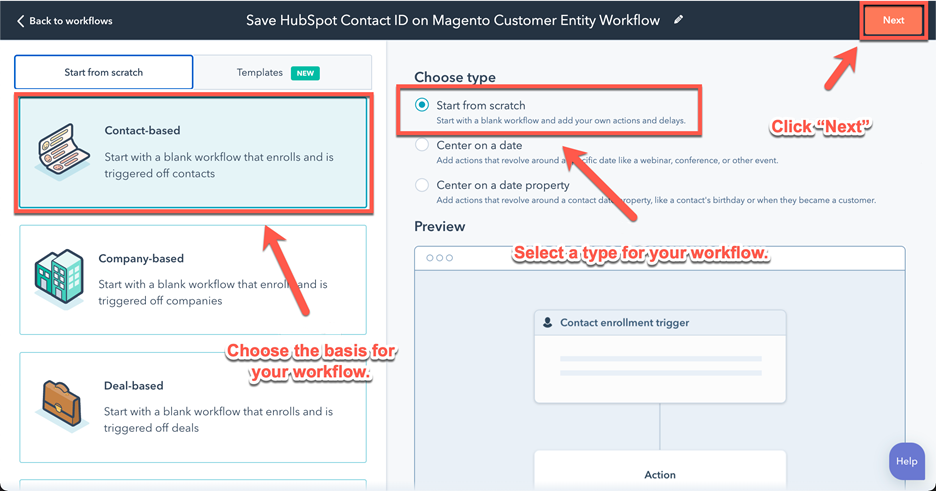
Step 6 – You are now on the workflow editor. First provide a name for your workflow. For this example I will be using Save HubSpot Contact ID on Magento Customer Entity Workflow.
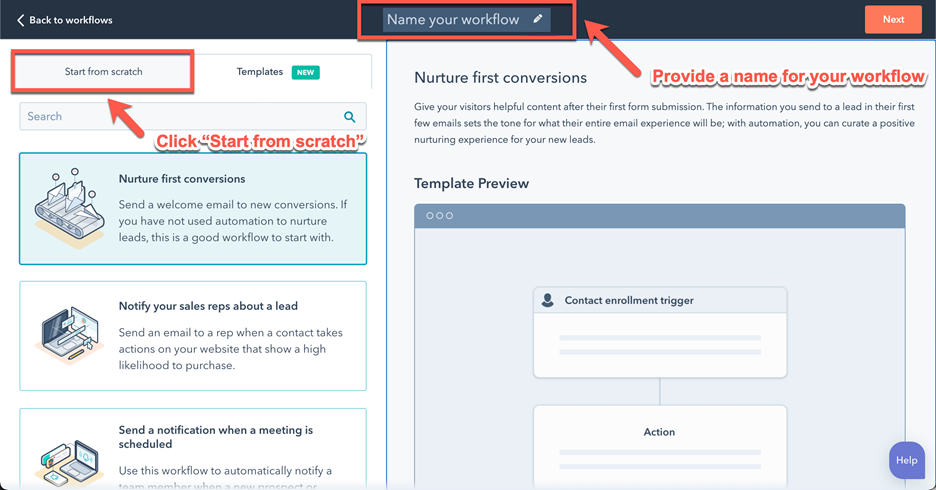
Step 7 – After you have edited the name, click on Start from scratch. This will allow you to create and manipulate a workflow in any way that you wish.
For this example, I will be selecting Contact-based Workflow since I want to take data from the HubSpot Contact and use that data outside the HubSpot CRM. But webhooks and triggers are available for other HubSpot entities as well. If you wanted instead to sync data about your HubSpot Deal outside of the HubSpot CRM, you would need to instead select a Deal-based Workflow. The information that can be passed from a webhook or trigger is based on the type of workflow you choose.
Step 8 – All workflows start with an Enrollment Trigger – so you must start there. An Enrollment Trigger is an event that happens that allows your workflow to be executed. For instance, when a new HubSpot CRM contact is found in the system. Or if a HubSpot CRM contact fills out a specific form on your website. There are many different scenarios and qualifiers. HubSpot provides lots of helpful information about Enrollment Triggers here: https://knowledge.hubspot.com/workflows/set-your-workflow-enrollment-triggers
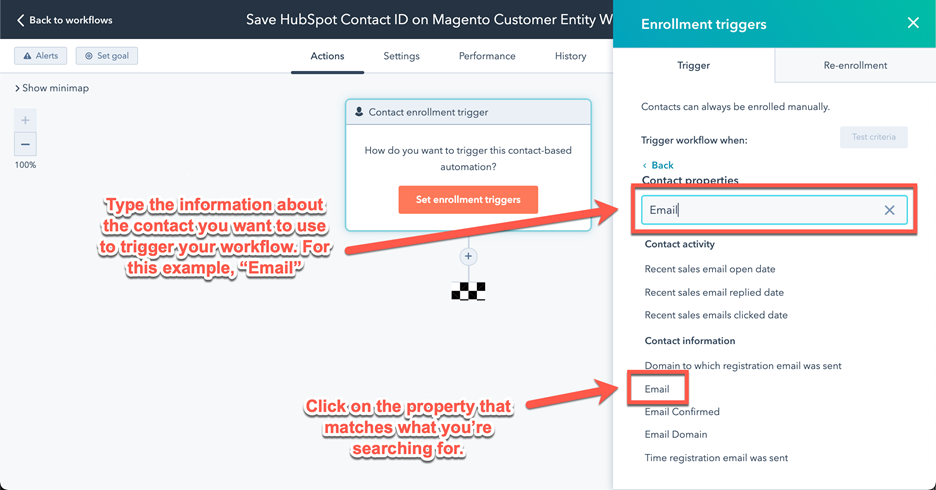
For this example, I wish to have my workflow run for ALL contacts in the HubSpot CRM that have an email assigned to the contact (which should be all, since email address is a required identifier for HubSpot contacts). Email address is also a requirement for Magento customers, so this info can be used to link the records in the two systems together using a unique identifier.
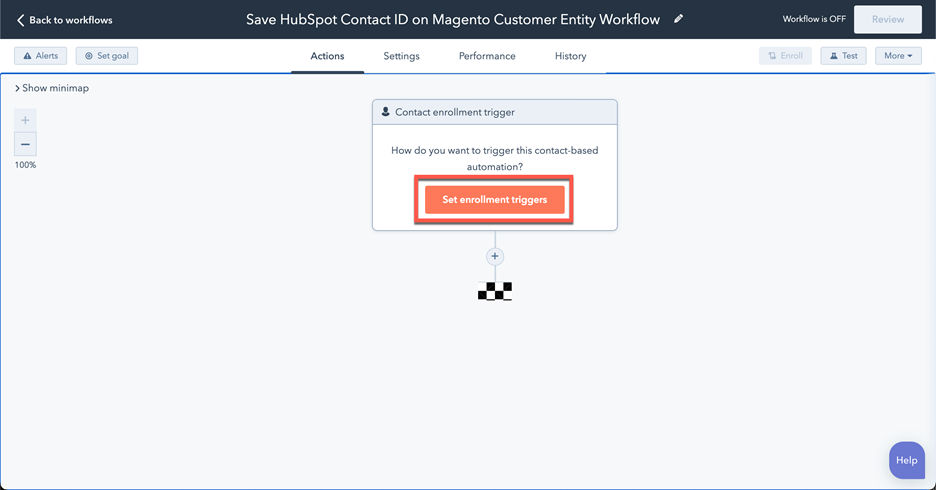
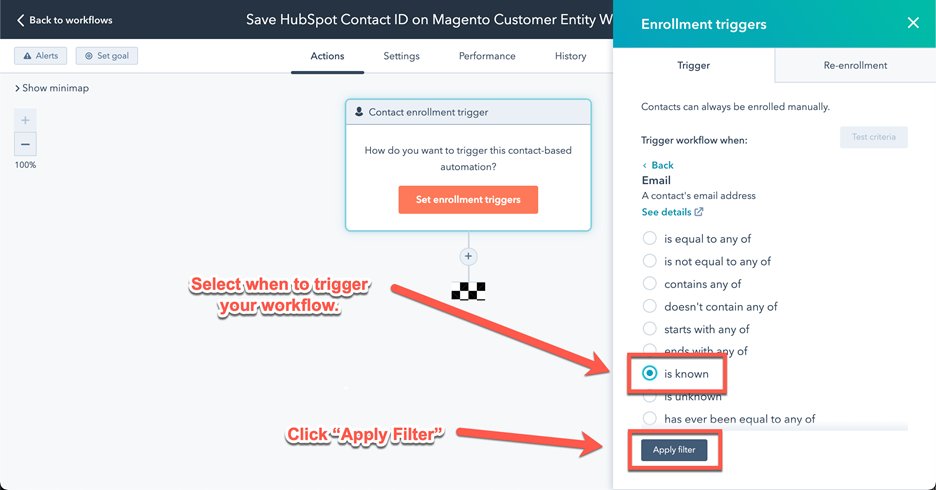
When first landing on the Workflow editor, the first section will prompt you to set an Enrollment Trigger. Click on the button Set Enrollment Trigger.
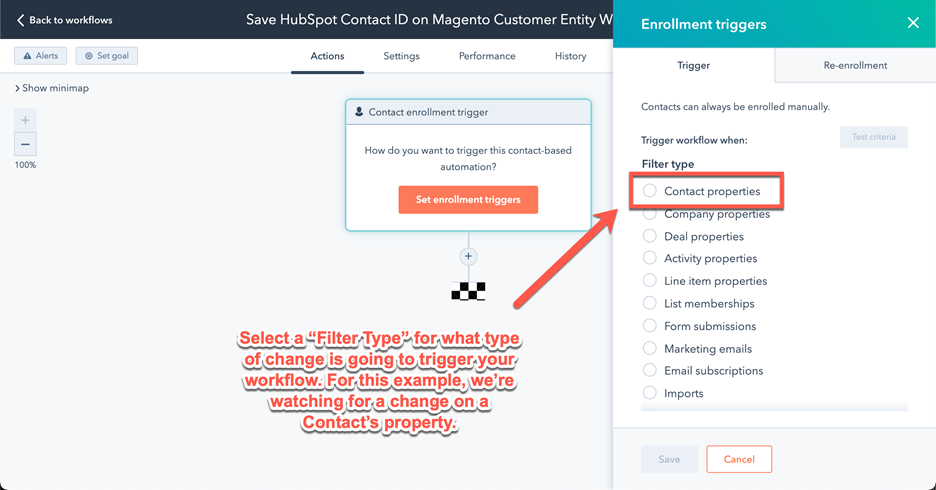
The next panel that pops up will ask when you want this trigger to be executed. For this example, I am going to select Trigger this workflow when a Contact’s Email is known.
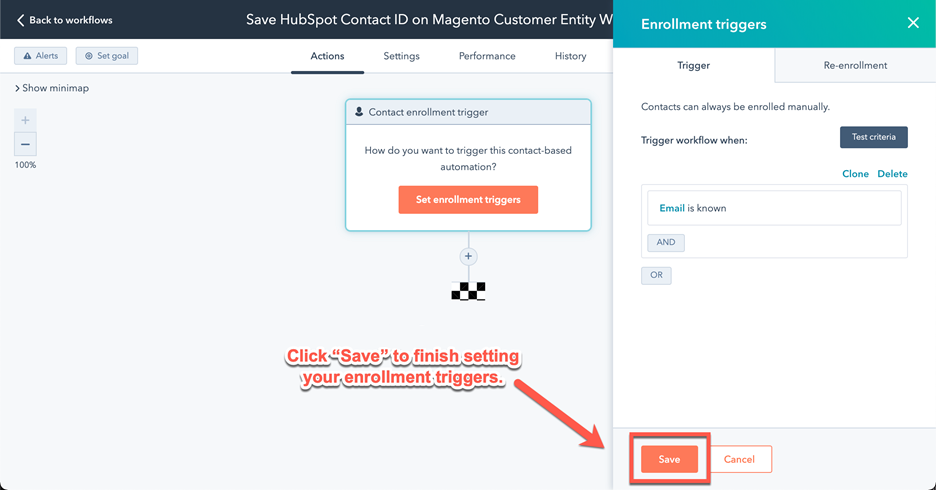
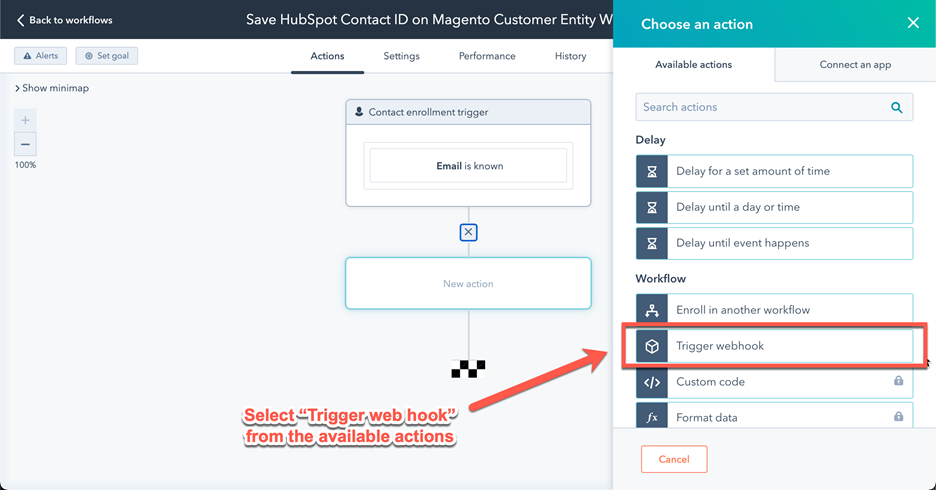
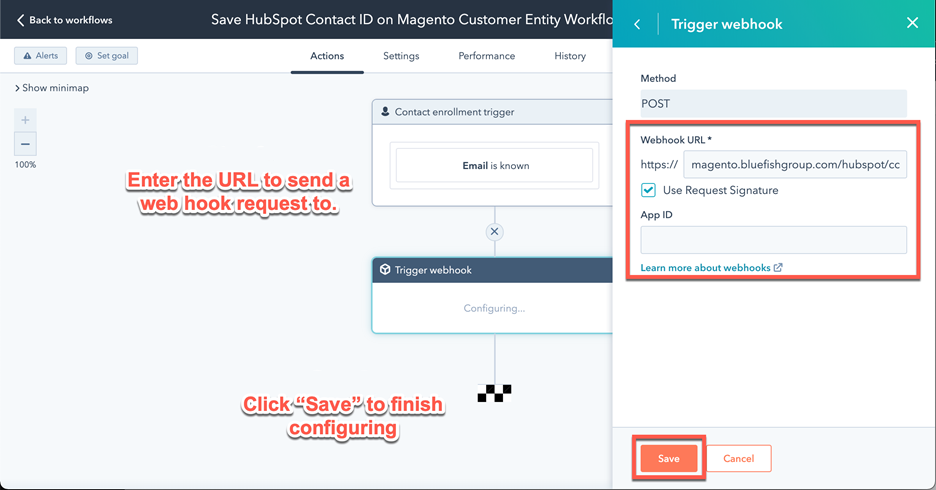
Step 9 – Now you will add your next action. This is where we’re going to be setting up our webhook that will make a call to Magento to transmit data about this contact.
If you’re using the Magento module, you can then setup a webhook that will make a request to the controller that the BlueFish_HubSpotWebhook set up. These incoming requests are accepted at yourwebsite.com/hubspot/contact/webhook. If you are not using the Magento module, you just need to enter the URL of any controller you have setup in your Magento instance to setup incoming requests from the webhook trigger.
We strongly recommend using webhook Request Signature validation for security purposes. In order to do so you can find additional details here: https://knowledge.hubspot.com/workflows/how-do-i-use-webhooks-with-hubspot-workflows
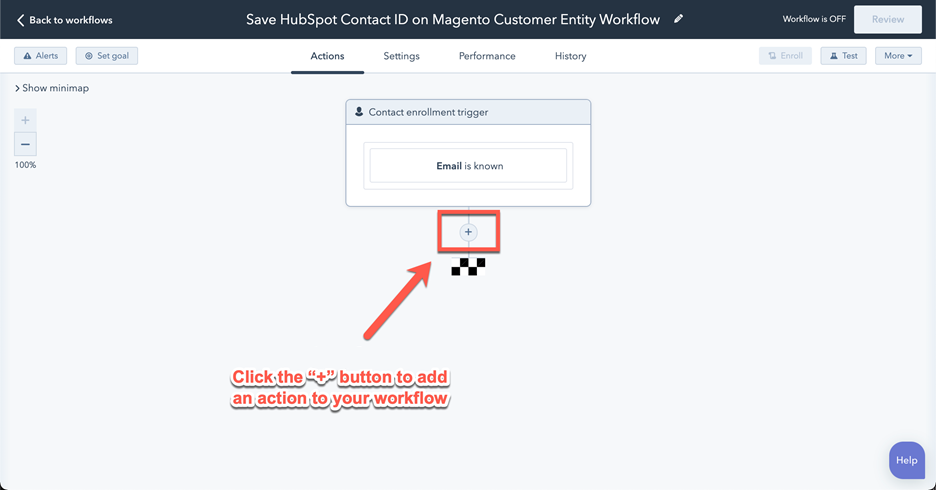
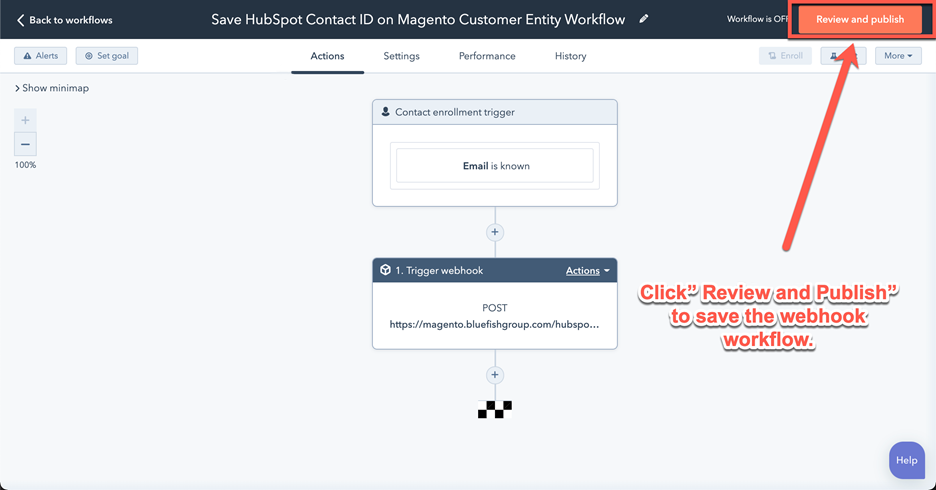
Step 10 – Once you’ve clicked Save, you can see all of the steps you’ve created and review them before running your workflow.
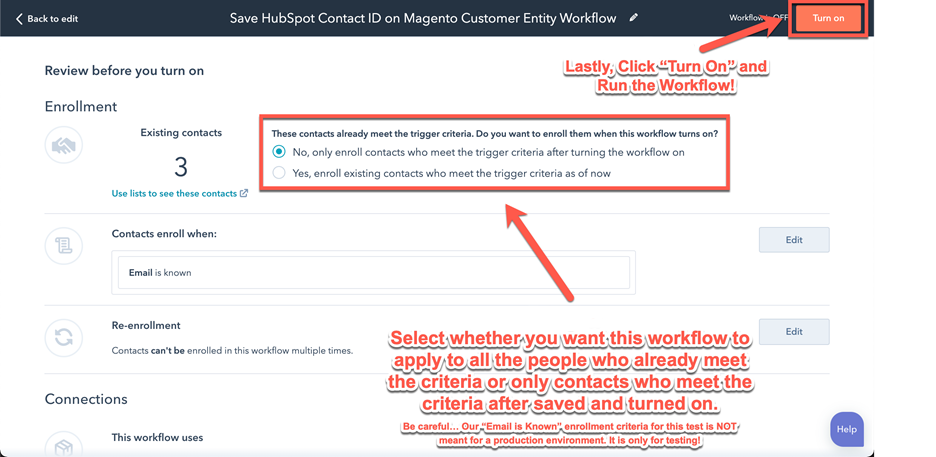
Be very careful which selection you make under the Enroll to Existing Contacts choice selection. The two different options you can pick are self-explanatory. You can either chose to run your workflow for all people who meet the enrollment criteria defined in your workflow or for any NEW people who meet the enrollment criteria AFTER you’ve enabled your workflow. Be careful! The steps in this demo are for illustration purposes only. Our enrollment criterium for this test is to find any contact with an email that is known. That means ALL of your contacts will be enrolled. Therefore a webhook will be fired for every single contact. This should only be done in a test or dev environment that does not have live customer data in it.
Step 11 – You may now click Turn on and run your workflow!
On the Magento side, you will see an incoming POST request to the URL that was configured. The request will contain the HubSpot contact vID (which you can retain using BlueFish\HubSpotWebhook\Controller\Contact\Webhook:: getContactVid()), and all other information about the contact that has been enrolled in the workflow, which can be retained using BlueFish\HubSpotWebhook\Controller\Contact\Webhook::getAllProperties(). Once you have this information you can do whatever you wish with the data you have received from within your Magento application.
We hope that this article has been helpful in providing you the tools to be able to trigger a webhook from a HubSpot CRM Workflow and be able to listen for that Webhook in your own Magento application. If you have any additional questions, please don’t hesitate to reach out to us! We are always happy to help.


