Introduction
Note:
This article isn’t an exhaustive dashlet development how-to. For an introduction to the platform and technologies used to build dashlets, a great place to start is the Alfresco Surf Platform Developers Guide.
Dashlets are a lot of fun. They expose a tremendous amount of functionality, and they give users and project teams the power to assemble and organize that functionality as they see fit. They can be as simple as the two file Hello World dashlet from Dr. Q’s Workshop. On the other hand, they can also be incredibly complex, with well over 20 files making up a single dashlet.
I know that when I first waded into the deep end of the dashlet pond, I started drowning quite quickly. Back when I was a naive ‘noob’, it took me a while to find my way around and comfortably accomplish some of the tasks I had assumed would be very easy. One of the areas I struggled with was figuring out how to make my dashlets configurable, so that end users could change the way they look or behave. I wanted to make dashlets similar to Alfresco’s Web View dashlet that lets users provide a URL, and then displays the page referenced by that URL within the dashlet.
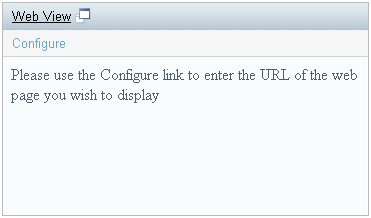
Figure 1:
Unconfigured instace of the Alfresco Web View dashlet.
The goal of this article is to help you understand how to make your dashlets configurable so that you can focus on the development of new features, and not the plumbing of configuration values.
Dashlets Are Easy, Sometimes
Dashlets can be very simple. For example, a simple Hello World dashlet can be implemented with just two files:
helloworld.get.desc.xml:
    <webscript>
    <shortname>Hello World</shortname>
    <description>Hello World Dashlet</description>
    <family>dashlet</family>
    <url>/components/dashlets/helloworld</url>
    </webscript>
helloworld.get.html.ftl:
    <div class="dashlet">
    <div class="title">Hello World</div>
    <div class="body">
    <span>Hello World</span>
    </div>
    </div>
Drop these two files into the
shareWEB-INFclassesalfrescosite-webscriptsorgalfrescocomponentsdashlets
directory and you’ve got a new dashlet ready to go.
If some dashlets can be so simple, why are others often so hard? Well, in this article I’m going to show you how taking this simple, static Hello World dashlet, and adding configuration capabilities expands these two source files into a total of 16 files. I know, I know; that sounds like a lot. But once you learn your way around you’ll be adding configuration capabilities to all you dashlets.
A Configurable Example
For the purposes of this article, I’ll be using an example dashlet that accepts and displays three configuration values. Not earth shattering functionality, but then very few people would have guessed Twitter was going to change the world when it was first rolled out. Here is a look at the end product in action:
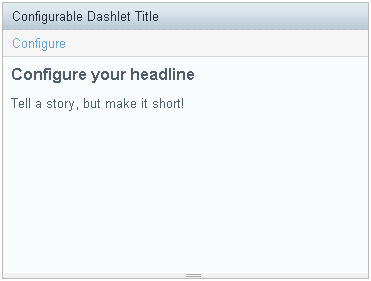
Figure 2:
Unconfigured instace of our example dashlet.
This dashlet allows users to dynamically configure its three displays values. As you can see below, it accepts a title, headline, and story:
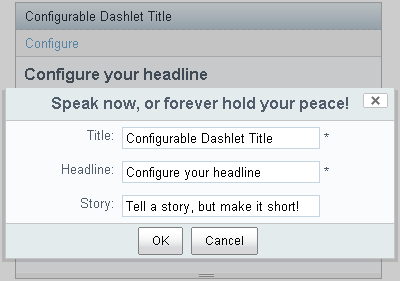
Figure 3:
Configuration dialog for our example dashlet.
Once the configuration dialog is saved the dashlet on the dashboard is automatically updated with the new values, and those values are persisted for all future views of that instance of the dashlet.
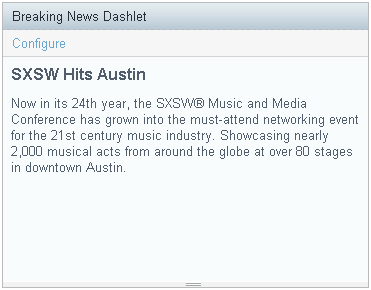
Figure 4:
Configured instace of our example dashlet.
Anatomy of a Dashlet’s Configuration Process
As you begin experimenting with dashlet development, I highly recommend that you check out the Alfresco Developers Wiki. This site has some tremendously useful Web Scripts framework documentation and examples. One particularly helpful section discusses the framework’s use of the MVC pattern, and how a Web Script’s execution flows through the framework. In that section the following diagram is used to help explain the flow:
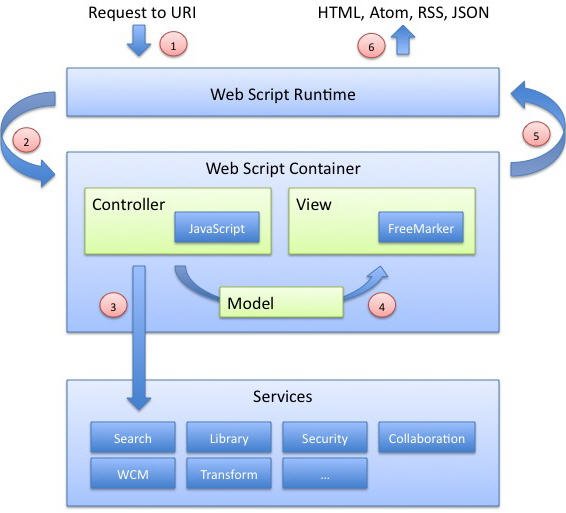
Figure 5:
(from https://wiki.alfresco.com/wiki/Image:WebOrientedRestStyleArchitecture.jpg)
Our example dashlet will actually complete this loop three different times as we interact with it. Let’s quickly review each of the three loops.
Main Dashlet Display
The initial loop is completed every time our dashlet is drawn onto a dashboard. In this loop, the steps highlighted in the diagram execute as follow:
- The dashboard includes the dashlet and makes a call to the Web Script Runtime using the dashlet’s URL.
- aafb.get.desc.xml – The Web Script Runtime finds the appropriate Web Script as defined in the aafb.get.desc.xml then hands off to the controller for execution.
- aafb.get.js / aafb.get.config.xml – The JavaScript controller (aafb.get.js) executes, using the configuration values in the config xml (aafb.get.config.xml) as necessary.
- aafb.get.head.ftl / aafb.get.html.ftl / aafb.get.properties – The view uses values set on the model by the controller and properties from the aafb.get.properties to assemble and render a response with the FreeMarker templates defined in aafb.get.head.ftl and aafb.get.html.ftl.
- The Web Script Runtime sends the results back using the appropriate protocol.
- The Web Script client receives the response in the requested format. In this case, that format is HTML.
Configuration Dialog Display
The second loop is completed when users click on the dashlet’s Configure link. In this loop, the steps highlighted in the diagram execute as follow:
- aafb.js – The onConfigAafbClick method defined in the aafb.js is called when a user click the Config link, and this initiates a request to the Web Script Runtime.
- config-aafb.get.desc.xml – The Web Script Runtime finds the appropriate Web Script as defined in the config-aafb.get.desc.xml then hands off to the controller for execution.
- No controller logic is necessary to render the dialog, so control passes straight to the view.
- config-aafb.get.head.ftl / config-aafb.get.properties – The view uses properties from the config-aafb.get.properties to assemble and render a response using the FreeMarker template defined in config-aafb.get.html.ftl.
- The Web Script Runtime sends the results back using the appropriate protocol.
- The Web Script client receives the response in the requested format. In this case, that format is HTML.
Configuration Dialog Processing
The final loop is completed when a user submits the configuration dialog by clicking the OK button. In this loop, the steps highlighted in the diagram execute as follow:
- The Web Script Runtime is called a third time when a user submits the configuration dialog.
- config-aafb.post.desc.xml – The Web Script Runtime finds the appropriate Web Script as defined in the config-aafb.post.desc.xml then hands off to the controller for execution.
- config-aafb.post.json.js – The JavaScript controller (config-aafb.post.json.js) executes.
- config-aafb.post.json.ftl / config-aafb.post.properties – The view uses values set on the model by the controller and properties from the config-aafb.post.properties to assemble and render a response using the FreeMarker template defined in config-aafb.post.json.ftl.
- The Web Script Runtime sends the results back using the appropriate protocol.
- The Web Script client receives the response in the requested format. In this case, that format is JSON.
A Closer Look
First, let’s look at where the 16 files that make up this dashlet live within the context of the Share application. Here is a view of the files that make up our example dashlet deployed into Alfresco Enterprise 3.2r:
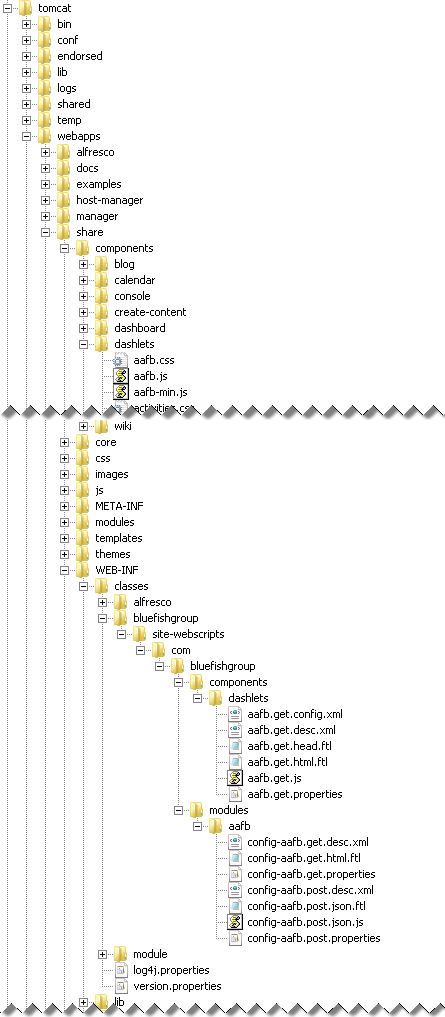
Figure 6:
Deployed view of all the files that make up our example dashlet.
If this looks a little foreign to you, then let me direct you over to a great article about Alfresco source code organization written by my colleague Josh Toub.
These 16 files require 9 easy steps to enable our configuration functionality. Let’s dive right in.
Define Defaults
The first thing we need to do is define some default values for our configuration parameters. These default values will be used when the dashlet is first instantiated onto the dashboard. Default values are defined in the aafb.get.config.xml file as follows:
    <aafb>
    <title>Configurable Dashlet Title</title>
    <headline>Configure your headline</headline>
    <story>Tell a story, but make it short!</story>
    </aafb>
Set Configuration Parameter Values
Next, we need to tell our JavaScript controller how to handle our configuration parameters and where to look for defaults. This is all done in the aafb.get.js file as follows:
    function main()
    {
     var title = args.title;
     var headline = args.headline;
     var story = args.story;

     // Create XML object to pull values from
     //configuration file
     var conf = new XML(config.script);

     // Use the defaults from the XML configuration file
     // (aafb.get.config.xml) if no values in args array
     if (!title)
     {
     title = conf.title[0].toString();
     }

     if (!headline)
     {
     headline = conf.headline[0].toString();
     }

     if (!story)
     {
     story = conf.story[0].toString();
     }

     // Set values on the model for use in templates
     model.title = title;
     model.headline = headline;
     model.story = story;
    }

    main();
Layout/Use Configuration Values on Dashlet Display
Now that we’ve got some configuration values defined, we need to display them within our dashlet. We define the dashlet’s layout with a FreeMarker template in the
aafb.get.html.ftl file as follows:
    <script type="text/javascript">//< ! [CDATA[
    new Alfresco.Aafb("${args.htmlid}").setOptions(
    {
    "componentId": "${instance.object.id}",
    "titleStr": "${title}",
    "headlineStr": "${headline}",
    "storyStr": "${story}"
    });
    new Alfresco.widget.DashletResizer("${args.htmlid}",
    "${instance.object.id}");
    //] ] ></script>

    <div class="dashlet aafb">

    <div id="${args.htmlid}-title" class="title">
    ${title}
    </div>

    <div class="toolbar">
    <a id="${args.htmlid}-configAafb-link" class="configure theme-color-1"
    href="#">${msg("config")}</a>
    </div>

    <div class="body scrollableList">
    <h2><span id="${args.htmlid}-headline">
    ${headline}</span></h2>
    <p><span id="${args.htmlid}-story">
    ${story}</span></p>
    </div>

    </div>
This template uses properties values from the aafb.get.properties file and has access to the scripts included in the aafb.get.head.ftl file.
Create Instance of Custom Object for Managing Configuration
At the top of our aafb.get.html.ftl you probably noticed a script block. The first seven lines within that block create a new instance of a custom object. This custom object is used to manage the values of our configuration parameters and control the behavior of the configuration dialog used to set those values.
When the script block executes on the loading of our dashlet, the constructor and setOptions methods of our custom object are called. Those methods are defined in the aafb.js file. The code snippet below provides the entire contents of the aafb.js so that you can see how these two methods fit into the overall file. We’ll discuss the individual sections of the file a little bit later.
    /**
    * Alfresco.Aafb
    **/
    (function()
    {
    /**
    * YUI Library aliases
    */
    var Dom = YAHOO.util.Dom,
    Event = YAHOO.util.Event;

    /**
    * Alfresco Slingshot aliases
    */
    var $html = Alfresco.util.encodeHTML;

    Alfresco.Aafb = function(htmlId)
    {
    this.name = "Alfresco.Aafb";
    this.id = htmlId;
    this.configDialog = null;

    /**
     * Register this component
     */
    Alfresco.util.ComponentManager.register(this);

    /**
     * Load YUI Components
     */
    Alfresco.util.YUILoaderHelper.require([],this.onComponentsLoaded,this);

    return this;
    };

    YAHOO.extend(Alfresco.Aafb, Alfresco.component.Base,
    {
    /**
     * Object container for initialization options
     *
     * @property options
     * @type object
     */
    options:
    {
      /**
       * The component id
       *
       * @property componentId
       * @type string
       * @default ""
       */
      componentId: "",

      /**
       * The configurable title to display
       *
       * @property titleStr
       * @type string
       * @default ""
       */
      titleStr: "",

      /**
       * The configurable headline to display
       *
       * @property headlineStr
       * @type string
       * @default ""
       */
      headlineStr: "",

      /**
       * The configurable story to display
       *
       * @property storyStr
       * @type string
       * @default ""
       */
      storyStr: ""
    },

    /**
     * Fired by YUI when parent element is available for scripting.
     * Component initialisation, including instantiation of YUI widgets
     * and event listener binding.
     *
     * @method onReady
     */
    onReady: function A_onReady()
    {
      // Add click handler to config Aafb link that will be visible if user
      // is site manager.
      var configFeedLink = Dom.get(this.id + "-configAafb-link");
      if (configFeedLink)
      {
      Event.addListener(configFeedLink,"click",
      this.onConfigAafbClick,this,true);
      }
    },

    /**
     * Called when the user clicks the config Aafb link.
     * Will open an Aafb config dialog
     *
     * @method onConfigAafbClick
     * @param e The click event
     */
    onConfigAafbClick: function A_onConfigAafbClick(e)
    {
     var actionUrl = Alfresco.constants.URL_SERVICECONTEXT +
     "modules/aafb/config/" + encodeURIComponent(this.options.componentId);

      if (!this.configDialog)
      {
      this.configDialog = new Alfresco.module.SimpleDialog(this.id
      +"-configDialog").setOptions({width: "30em",
      templateUrl: Alfresco.constants.URL_SERVICECONTEXT +
      "modules/aafb/config",
          actionUrl: actionUrl,
          onSuccess:
          {
            fn: function Aafb_onConfigFeed_callback(response)
            {
              var aafb = response.json;

     // Save values for new config dialog openings
     this.options.titleStr = (aafb && aafb.title) ?
     aafb.title : this.options.titleStr;
     this.options.headlineStr = (aafb && aafb.headline) ?
     aafb.headline : this.options.headlineStr;
     this.options.storyStr = (aafb && aafb.story) ?
     aafb.story : this.options.storyStr;

     // Update dashlet body with new values
     Dom.get(this.id + "-title").innerHTML    = aafb ? aafb.title : "";
     Dom.get(this.id + "-headline").innerHTML = aafb ? aafb.headline : "";
     Dom.get(this.id + "-story").innerHTML    = aafb ? aafb.story : "";
     },
     scope: this
     },
    doSetupFormsValidation:
     {
     fn: function Aafb_doSetupForm_callback(form)
     {
      form.addValidation(this.configDialog.id + "-title",
      Alfresco.forms.validation.mandatory, null, "keyup");
      form.addValidation(this.configDialog.id + "-headline",
      Alfresco.forms.validation.mandatory, null, "keyup");
      form.setShowSubmitStateDynamically(true, false);

   Dom.get(this.configDialog.id + "-title").value = this.options.titleStr;
   Dom.get(this.configDialog.id +"-headline").value=this.options.headlineStr;
   Dom.get(this.configDialog.id + "-story").value =  this.options.storyStr;
            },
            scope: this
          }
        });
      }
      else
      {
        this.configDialog.setOptions(
        {
          actionUrl: actionUrl
        });
    }
    this.configDialog.show();
    }
    });
    })();
Layout Configuration Dialog
Next, let’s look at the implementation of the dialog used to set configuration values. Much like the dashlet itself, the configuration dialog is rendered with a FreeMarker template. In our example, the config-aafb.get.html.ftl file is used as follows:
<div id="${args.htmlid}-configDialog" class="config-aafb">
<div class="hd">${msg("label.dialogTitle")}</div>
<div class="bd">
<form id="${args.htmlid}-form" action="" method="POST">
<div class="yui-gd">
<div class="yui-u first"><label for="${args.htmlid}-title"
>${msg("label.title")}:</label></div>
<div class="yui-u"><input id="${args.htmlid}-title"
type="text" name="title" value="" maxlength="30" /> *<
/div>
</div>
<div class="yui-gd">
<div class="yui-u first"><label for="${args.htmlid}-headline"
>${msg("label.headline")}:</label></div>
<div class="yui-u"><input id="${args.htmlid}-headline"
type="text" name="headline" value="" maxlength="75" />
*< /div>
</div>
<div class="yui-gd">
<div class="yui-u first"><label for="${args.htmlid}-story"
>${msg("label.story")}:</label></div>
<div class="yui-u"><input id="${args.htmlid}-story"
type="text" name="story" value="" maxlength="256" /></div>
</div>
<div class="bdft">
<input type="submit" id="${args.htmlid}-ok"
value="${msg("button.ok")}" />
<input type="button" id="${args.htmlid}-cancel"
value="${msg("button.cancel")}" />
</div>
</form>
</div>
</div>
Just like our aafb.get.html.ftl, the config-aafb.get.html.ftl uses properties from its own property file, config-aafb.get.properties.
Define Configuration Dialog Validation Behavior
With our dialog in place, let’s discuss how to define the validation behavior for fields on that dialog.
In the doSetupFormsValidation method we set up validation rules that make both the title and headline fields mandatory, and prevent users from submitting the dialog if the rules aren’t satisfied. In this method, we also set the form values to the current values of the configuration parameters so users can see what they’re about to change. This is all done in aafb.js as follows:
   doSetupFormsValidation:
   {
   fn: function Aafb_doSetupForm_callback(form)
   {
    form.addValidation(this.configDialog.id + "-title",
    Alfresco.forms.validation.mandatory, null, "keyup");
    form.addValidation(this.configDialog.id + "-headline",
    Alfresco.forms.validation.mandatory, null, "keyup");
    form.setShowSubmitStateDynamically(true, false);

    Dom.get(this.configDialog.id + "-title").value = this.options.titleStr;
    Dom.get(this.configDialog.id + "-headline").value =
    this.options.headlineStr;
    Dom.get(this.configDialog.id + "-story").value = this.options.storyStr;
   },
  scope: this
   }
Alfresco supplies many other form validation rules as part of its forms service. You can find more documentation on the Alfresco forms service on the Alfresco Wiki.
Submit Configuration Dialog
The configuration dialog is submitted via a POST to a JavaScript controller. The controller is implemented in the config-aafb.post.json.js file. This controller takes the values from the dialog’s form, sticks them in properties that are persisted, and then sets them on the model so the new values can be delivered back to our waiting callback function. You can see how simple this whole process is here:
    var c = sitedata.getComponent(url.templateArgs.componentId);

    var title = String(json.get("title"));
    var headline = String(json.get("headline"));
    var story = String(json.get("story"));

    c.properties["title"] = title;
    c.properties["headline"] = headline;
    c.properties["story"] = story;

    model.title = title;
    model.headline = headline;
    model.story = story;

    c.save();
Define Configuration Dialog Response
The response from our POST to the JavaScript controller carries our news values back to the aafb.js file in a JSON object. This object is handled by the onSuccess function that we’ll look at in the next section. The JSON response is defined by a FreeMarker template in the config-aafb.post.json.ftl as follows:
    <#escape x as jsonUtils.encodeJSONString(x)>
    {
     "title": "${title!''}",
     "headline": "${headline!''}",
     "story": "${story!''}"
    }
    </#escape>
Process Configuration Dialog Response
The final thing we need to do is define what our dashlet should do when new values are successfully submitted and processed through the configuration dialog. In the onSuccess function we setup a callback mechanism that accepts the JSON response and sets some values. First, we set the values of our custom object. Then we update the contents of the dashlet’s markup so that users will automatically see the new values. This is all done in aafb.js as follows:
    onSuccess:
    {
    fn: function Aafb_onConfigFeed_callback(response)
    {
    var aafb = response.json;

    // Save values for new config dialog openings
    this.options.titleStr    = (aafb && aafb.title) ? aafb.title :
    this.options.titleStr;
    this.options.headlineStr = (aafb && aafb.headline) ?
    aafb.headline:  this.options.headlineStr;
    this.options.storyStr    = (aafb && aafb.story) ? aafb.story :
    this.options.storyStr;

    // Update dashlet body with new values
    Dom.get(this.id + "-title").innerHTML    = aafb ? aafb.title : "";
    Dom.get(this.id + "-headline").innerHTML = aafb ? aafb.headline : "";
    Dom.get(this.id + "-story").innerHTML    = aafb ? aafb.story : "";
   },
   scope: this
   },
A Few Words of Advice
Now that you’ve seen how a simple dashlet that supports configuration is assembled, let’s take a moment to talk about a few of the areas that could trip you up.
Don’t Lose Your Head
Don’t forget to include the *.get.head.ftl (aafb.get.head.ftl in our example) file in your dashlet. There isn’t much going on in this file, but without it, you won’t have access to your *.js file(s) or any custom styles you might define in a
*.css file. If you see something like this in your JavaScript console:
Alfresco.Aafb is not a constructor
It’s likely that the problem is that you’ve left out your *.get.head.ftl file. This would be a great place to start your troubleshooting efforts. Trust me. I speak from experience.
Minified JavaScript
By default, Alfresco is configured to look for minified JavaScript files. JavaScript minification is the process of removing all unnecessary characters from the source to minimize the file size, without changing the JavaScript’s functionality. This helps improve your site’s performance, but it can make development a little trickier.
In your *.get.head.ftl file you’ll see a line like this:
<@script type="text/javascript" src="${page.url.context}/components
/dashlets/aafb.js"></@script>
This line makes your *.js file available to the rest of the files in your dashlet. But by default, Alfresco will actually replace the reference to aafb.js with a reference to aafb-min.js. So, if you haven’t created a -min version of your JavaScript, your dashlet won’t work.
One way to address this is by ensuring that the minified version of your JavaScript file(s) is current and available inside the same folder as your base JavaScript file. You could do this by manually copying and renaming your base JavaScript file after each change (ouch!), or through the use of a development tool such as JSMIN to generate JavaScript files that are actually minified.
Alternatively, you could configure Alfresco to not look for the minified JavaScript file during your development process. One simple way to do this is to change the <@script> tag in your *.get.head.ftl file to a <script> tag. This would change the reference in your *.get.head.ftl to look something like:
<script type="text/javascript" src="${page.url.context}/components/
dashlets/aafb.js"></script>
Parting Thoughts
There you have it, a straightforward (as straightforward as I can put it anyway) example of a custom dashlet that supports configuration. The number of files required to support configuration can seem intimidating at first, but I hope this article has shown you that once you understand how the files work together, it’s really not all that complex.
So, now that you know how enable configuration in your own custom dashlets, what will you build? To help you get started, I’ve included a collection of documentation, links, and source files in the Resources section. Please share your questions, thoughts and ideas in the comments below. Thanks, and happy configuring!
Resources
The following links and documents were referenced in writing this article, and are a great source for more information on all of the topics above:


