Overview
The WDK Combo Container component is heavily utilized throughout Webtop to provide a
consistent and flexible user interface for performing coordinated actions upon multiple repository objects.
It is used by many of the core document actions in Webtop, such as Import, Checkout, Checkin,
Cancel Checkout, Link Here, and Export, as well as other multiselect actions and use cases that are perhaps a bit
more obscure, and it can provide a robust starting point for building custom multiselect components.
The key features provided by the Combo Container are Multiselect Argument Decoding, Value Propagation,
and Auto-Commit.
A solid understanding of the Combo Container framework is often useful and sometimes vital when
attempting customization of that framework or any of the components which depend on it.
If one is planning to build a new custom component based directly on the Combo Container, it is even more
important to have a firm grasp of the framework’s interactions and extension points.
The Combo Container implementation includes several well-defined hooks and event handler methods which
subclasses can utilize to customize its behavior; however, some of these extension points are poorly
defined or even obfuscated, making it difficult to build reliable and robust custom components that
properly utilize the Combo Container.
The information in this article is meant to provide a high level understanding of how the various
Combo Container mechanisms function and interact, and to warn against some of the more insidious pitfalls.
It is not a detailed blueprint for customizing the framework, but rather a head start toward understanding
the overall landscape, so the reader can focus more time on implementing and less time ramping up.
Note:
This article was written based on Webtop 6.0 SP1.
WDK Context
The ID for the base Combo Container component is combocontainer. Its component
definition can be found at /wdk/config/combocontainer_component.xml. The Java
component class is located at com.documentum.web.formext.component.ComboContainer.
The Combo Container component utilizes two different JSP pages, both of which are configured in the
component XML:
- start
/wdk/container/combocontainer.jspDisplays the current contained component and any headers, footers, etc.
- autocommit
/wdk/container/comboautocommitex.jspDisplays the progress bar and drives client-side events during auto-commit.
(More on these pages later.)
ComboContainer Type Hierarchy
The ComboContainer component extends the WizardContainer component, and as such
inherits the behavior of WizardContainer, DialogContainer, Container,
Component, Form, and Control.
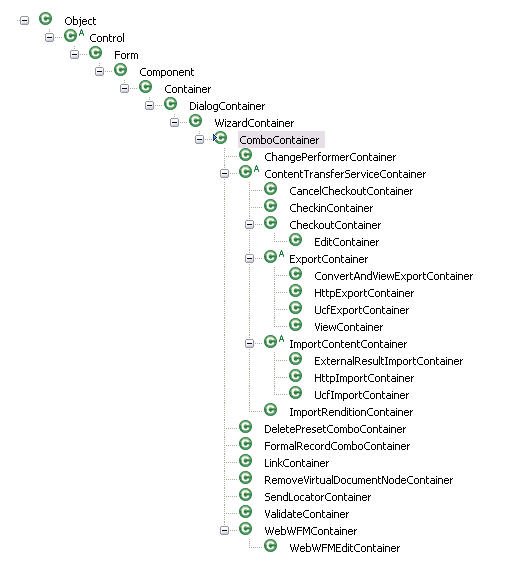
Figure 1:
ComboContainer Type Hierarchy
Control, Form, and Component provide the core functionality and
framework integration require by all WDK components.
Container provides the core WDK container capabilities, enabling the component to contain
another component.
DialogContainer provides the standard dialog UI, including the OK and Cancel buttons and their
event handlers, as well as the dialog label.
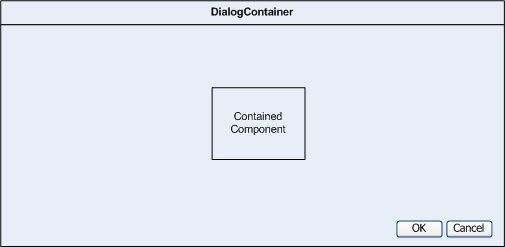
Figure 2:
DialogContainer Component Overview
WizardContainer provides support for multiple contained components and UI for pagination,
including the Next and Previous buttons and their event handlers, as well as the internal state necessary
to keep track of which contained component is currently being displayed.
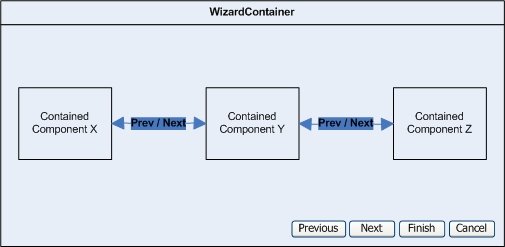
Figure 3:
WizardContainer Component Overview
ComboContainer adds support for multiple instances of the same contained component,
and it provides a framework to coordinate and automate the behavior of those components, through
value propagation and auto-commit.
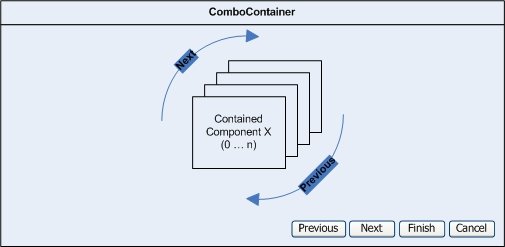
Figure 4:
ComboContainer Component Overview
Basic Mechanics
To begin, let me walk you through a short overview of the basic Combo Container mechanics.
The component lifecycle for the Combo Container is similar to that of the container classes it
extends, with the added dimension of multiple, indexed components. Instead of simply containing a single
component with multiple pages, as is the case for the WizardContainer, ComboContainer
contains multiple, indexed instances of the same component, through which the user can move forward
and backward using the Next and Previous buttons.
To accomplish this, the ComboContainer maintains internal state to keep track of the array of contained
components as well as the index of the “current” component. The basic mechanics of the pagination
and containership are encapsulated by the methods described below.
Public Methods
void onInit(ArgumentList)
Called once when the container is initialized. This method sets up component state, decodes the
multiselect arguments, and initializes value propagation.boolean hasPrevPage()andboolean hasNextPage()
Overrides implementations inherited fromWizardContainerin order to support multiple
indexed instances of the same component and report whether there are any more components before/after
the current one.boolean onPrevPage()andboolean onNextPage()
Overrides implementations inherited fromWizardContainerto move the “current
component” index backward or forward, as appropriate. TheonNextPagealso includes
logic for stopping an auto-commit that has failed due to validation or other problems.boolean canCommitChanges()
Hard-coded in theComboContainerto returntrue, this method can be overridden
to drive the visibility of the Finish button and to prevent theonCommitChangesmethod
from being called as necessary.boolean onCommitChanges()
This method encapsulates logic for saving changes across all components, and for launching the
auto-commit process for any components beyond the current one. This includes launching the
auto-commit confirmation prompt dialog, and stopping the auto-commit if any of the component
commits fail due to validation or other problems.
Protected Methods
int getComponentCount()
Returns the number of contained components, which should match the number of items multiselected
and passed into the container. Note that this count does NOT correspond to the two JSP pages utilized
by the container (start and autocommit).int getCurrentComponent()
Returns the index of the “current” component — the one that is currently being rendered by the
container. The contained components are indexed in order, starting with 0.void setCurrentComponent(int)
Sets the current component to be the one with the given index. The contained components are indexed
in order, starting with 0.ArrayList getContainedComponents()
Returns anArrayListcontaining the contained components, in order.
Multiselect Argument Decoding
The primary use case for the Combo Container is to provide multiselect behavior for a specific contained
component. When a user makes multiple selections in the WDK UI and performs a multiselect action, the
selections are encoded and passed into the single Combo Container component. The
ComboContainer class’s onInit method then decodes these arguments and stores
them to be passed into the appropriate contained component instance upon initialization.
How It Works
The onInit method looks at the argument "componentArgs", and if it begins
with the string "___dmfStoredArgsKey", it calls the retrieveComponentArgs
method to extract the array of ArgumentList objects to use for all contained components.
This feature of the Combo Container framework is fairly straightforward, but if for some reason you
must override the way that multiselect arguments are encoded, you may need to dig into the implementation
of the onInit method.
Public Methods
void onInit(ArgumentList)
As mentioned above, this lifecycle method decodes theArgumentListarray corresponding
to the multiple contained component instances, based on the encodedString[]returned
by theretrieveComponentArgsmethod.String[] retrieveComponentArgs(String strUniqueComponentArgsKey)
Extracts the arguments for the contained components from the Session. This static method is called
by theonInitmethod to get the encoded argument data out of the user’s Session.
This method is static and cannot be overridden. To provide custom decoding, you may need to
override theonInitand/orsetContainedComponentArgsmethods. (See below.)
Protected Methods
ArgumentList[] getContainedComponentArgs()
Returns an array ofArgumentListobjects corresponding to the arguments for each of the contained
components. The size of the array corresponds to the number of items selected — i.e. the number of
contained components.void setContainedComponentArgs(ArgumentList[])
Sets the array ofArgumentListobjects described above. This method is called by theComboContainer
code to set the argument array, and so can be a useful extension point for intercepting or modifying
this behavior, or for using your ownArgumentListarray instead of the one decoded by the ComboContainer
onInitandretrieveComponentArgsmethods.
Note:
It is important to recognize that the number of component instances created depends entirely on the size
of the ArgumentList array passed into setContainedComponentArgs.
ComboContainer uses this array to drive its instantiation of the contained component instances.
Value Propagation
One of the key features of the Combo Container is value propagation. Value propagation is the mechanism
by which the control values on the previous contained component are used to pre-populate the
control values for the current contained component when it is first initialized, thereby propagating
those values from one component to the next and saving the user the trouble of entering the same
values over and over.
Configuration
Value propagation can be enabled within the component XML by setting the value of the
propagatepreviouspagevalues element to true. Note that this configuration element
only enables or disables value propagation when the user is manually moving through the contained
components. If the user triggers an auto-commit using the Finish button, this configuration is ignored and
value propagation is always used to populate the remaining components.
How It Works
The full mechanics of value propagation are mostly obfuscated, but at its core the mechanism works
as follows. When ComboContainer is first initialized, it registers itself as a control
listener, so that any time a control is initialized by a contained component, it will trigger the
onControlInitialized method of ComboContainer.
When the first contained component is initialized, the controls are initialized but nothing special
happens. When the form is submitted, control state is updated based on the values in the request
using the updateStateFromRequest method. This method keeps track of any controls whose
values have changed (using Control.hasChanged), so they can be propagated to the next
component if necessary. These changed controls are known as the “propagation controls”.
When the second component is initialized, the onControlInitialized hook looks at each control
as it is initialized and decides whether it is a candidate for value propagation. In order for a control
to be such a candidate, the container must have a similar control in its “propagation controls” set described
above. In this case, “similar” means the controls share the same name, type, and index. If the control
is a candidate for value propagation, the value is propagated, assuming propagation is supported for
that type of control. (See below.)
It is important to note that only certain types of controls are supported by value propagation.
Specifically, the ComboContainer.onControlInitialized method has logic to recognize
and propagate the value of any control that has bean methods for getting and setting that value,
as long as those method signatures are of the form T getValue() and
void setValue(T), where T is the value type. The ComboContainer class has
additional logic for dealing specifically with DateTime controls, which don’t conform to
the signatures above, and DocbaseAttribute and DocbaseAttributeValue controls
(and their subclasses), which require special processing.
Fortunately, most controls extend from StringInputControl, which has the necessary bean
methods and therefore meets the criteria for value propagation. Unfortunately, some controls do not
have bean methods conforming to the method signatures described above, and therefore value propagation
is not supported for these controls. This can be problematic, most notably in the case of the
Checkbox and Radio controls. As of Webtop 6.0 SP1, any value propagation that
is required for these types of controls must be implemented as a customization.
Note:
In order for value propagation to work, each control must actually be rendered by the WDK presentation
engine. This requires each component’s JSP page to be triggered, which is fine if the user is manually
paging through the components; however, the situation is not so simple during an auto-commit.
Note:
The “propagation controls” set is stateful for all contained components, which means that if a control is
changed in the first component, then not changed in the second component, that control is still available
for propagation to the third component.
Public Methods
void onControlInitialized(Form, Control)
Called for each control contained by the container as the control is initialized
(recursively into the contained components). This is the hook by which the value propagation
occurs for each contained control as appropriate. This is also where the custom logic for
handlingDateTime,DocbaseAttribute, andDocbaseAttributeValue
classes can be found. This method provides a useful extension point for adding value propagation
support for new Control types. The biggest challenge is being certain to use the same logic as the
ComboContainerclass for determining whether to propagate the value or not.void updateStateFromRequest()
Standard component lifecycle method, used to update component state based on data in the Request.
This method calls out to the private methodupdatePropagationControlsin order to
acquire handles to any controls whose values have changed and therefore need to be tracked for
purposes of value propagation. This is the “propagation controls” set described above.boolean isValueSetByPropagation(Control)
Returnstrueif the an auto-commit is active and if the given control is one whose
value can be set based on the previous component using value propagation; in other words, if a similar
control can be found in the “propagation control” set stored as part of theComboContainer
state.
Protected Methods
void setPropagatePreviousPageValues(boolean)
Sets the boolean flag indicating whether or not the previous component’s values should be propagated
to the current component when it is initialized. This method is called by the private method
initPropagatePreviousPageValues(see below) based on the value configured in
the component XML. This method can be called any time after theonInitmethod in order to
override the configured behavior. In addition, this method is called by the auto-commit code
in order to turn on value propagation regardless of configuration. (More on that later.)boolean isPropagatePreviousPageValues()
Returns the value of the flag described above. This method is called fromonControlInitialized
in order to determine whether or not to execute the value propagation logic when a new control is
initialized.void propagateAdditionalProperties(Control, Control)
Propagates configuration elements and other properties from one control to the other. Presumably
this is necessary in order for certain contained component instances to function properly. This method
is called fromonControlInitializedas well.
Private Methods
Although private methods cannot be overridden, understanding them can provide useful context.
void updatePropagationControls()
Called fromupdateStateFromRequest, this method scans all contained controls recursively
looking for any that have changed, so that these can be added to the internal hash of controls whose
values can be propagated. This is part of the internal value propagation state management, and cannot
be overridden, but it is useful to provide context for what goes on “inside the black box”.void initDocbaseAttributeControls(Control)
Called fromonControlInitializedwhen aDocbaseAttributeor
DocbaseAttributeValuecontrol is initialized (assuming value propagation is
enabled and there is a value to propagate). This internal method propagates additional state
from oneDocbaseAttributeorDocbaseAttributeValuecontrol to another;
is called at the end ofonControlInitializedafter the basic value propagation logic
has occurred.void initPropagatePreviousPageValues()
Sets the flag indicating whether value propagation is enabled, based on the
propagatepreviouspagevalueselement in the component configuration.
This private method is called fromonInitto set the flag initially, and it is also
called thestopAutoCommitmethod to reset the value propagation flag when
an auto-commit is stopped. (More on this below.)
Auto-Commit
When performing an action on multiple repository objects using the Combo Container, it is often
the case that the same attributes can be applied to all objects. Manually paging through the
components and entering the same metadata again and again can be time-consuming and error-prone.
Fortunately, the Combo Container has a solution to this problem, in the form of the auto-commit
mechanism.
The auto-commit mechanism is triggered by the Finish button, and it is responsible for driving automated
cycling through the Combo Container’s contained components. This cycling relies on a delicate coordination
of server- and client-side events which ensure that every contained component is properly initialized and
rendered (though not displayed), and validated, before ultimately committing all components.
Note:
It is critical that this automated request cycling occur. Not only is this the means by which the
user can track the progress of the auto-commit (by way of the progress bar), but it is also the only
way to guarantee that the value propagation logic functions properly, which is usually necessary for
the auto-commit to get past validation.
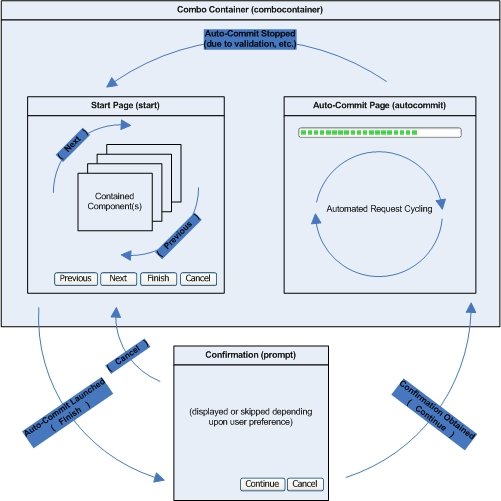
Figure 5:
Combo Container Auto-Commit Interactions
Configuration
None of the auto-commit behavior is configurable as part of the base combocontainer
component XML. As previously described, the only way to disable auto-commit is via the visibility
of the Finish button, which can be driven using the canCommitChanges method or by
setting the visibility of the Finish button directly.
How It Works
When a user clicks on the Finish button, it triggers the onOk event handler method
from DialogContainer.
This method first calls canCommitChanges, which is hard-coded in ComboContainer
to return true. Then it calls onCommitChanges, which calls
hasNextPage to determine whether there are any components beyond the current one.
If the hasNextPage method reports that there are additional components remaining after
the current one, then the current component is validated, and it is found to be valid, the auto-commit
mechanism is triggered.
First, the showConfirmPrompt method is called to ascertain whether the confirmation prompt
should be shown. If no confirmation is needed, the startAutoCommit method is called
immediately. Otherwise, the component nests to the prompt component to display the auto-commit confirmation
prompt, then triggers the onReturn method when it returns, which calls
startAutoCommit or not, depending on the user’s response.
Note:
The confirmation prompt can be disabled by the user through a user preference, in which case the
showConfirmationPrompt method would return false.
The startAutoCommit method overrides any configured value propagation flag, enabling value
propagation for the duration of the auto-commit process. It then switches the ComboContainer component’s
current page from the start page (used to display the contained component) to the
autocommit page, which is used to display the progress bar and to drive the client-side
events required to automate the request cycle. Finally, it sets the client event onPostAutoCommitEvent
to be triggered client-side when the page is rendered in the user’r broswer.
The behavior of onPostAutoCommitEvent client-side event depends on the value of the
JavaScript variable g_strAutoCommitEvent, which is set inside the onRenderEnd
method by appending some JavaScript code to the page. The value of this variable is used to tell
the client-side event which server-side event it must trigger to continue the auto-commit processing
as appropriate. The onRenderEnd method gets the value for this variable from the
private method getAutoCommitEvent.
The getAutoCommitEvent, although private, is critical. It is here that the auto-commit
mechanism’s core logic resides. As the automated cycling proceeds, this method gets called repeatedly
to automatically trigger the multiple onNext events necessary for paging through the
contained components, the onStopAutoCommit event if something goes wrong, and the
onOk event that it ultimately calls once it has cycled through all the contained
components.
Note:
Unfortunately, the getAutoCommitEvent is private and therefore cannot be overridden.
If it becomes necessary to customize the auto-commit interactions, the best approach is usually to
start with the standard component lifecycle methods, where you can sometimes “correct” or “undo”
changes made internally by the private Combo Container code. Use extreme caution when modifying
auto-commit interactions, as it is very easy to break the framework entirely.
As the framework cycles automatically through the contained components, the onNextPage
method is utilized by the onNext event handler in order to move the “current” component
forward. If it encounters any trouble due to validation, the “stoppingAutoCommit” flag is set, which
will ultimately lead the getAutoCommitEvent method to trigger a client-side event to
stop the auto-commit. But if the onNext calls succeed, eventually the framework runs out
of contained components, and at this point (when hasNextPage returns false,
the getAutoCommitEvent method triggers the onOk event handler, which, as
described above, calls onCommitChanges.
At this point, the onCommitChanges method recognizes that there are no more remaining
components to visit, and so it proceeds to call each contained component’s onCommitChanges
method. If anything goes wrong, the component is displayed along with the error; otherwise, the commit
has succeeded and the component returns to the context from which it was originally called!
Public Methods
void onReturn(Form, Map)
This is the event handler which processes the return from nest to the auto-commit confirmation prompt.boolean inAutoCommit()
Reports whether an auto-commit is currently active, which is true if the current container
page is theautocommitpage and whether the internal “stoppingAutoCommit” flag
has not been set.void onRenderEnd()
If an auto-commit is active, this method appends the JavaScript necessary to trigger any
client-side events.void pauseAutoCommit()
This method sets a flag indicating that the auto-commit should be paused. If set, this flag will
be picked up whenonRenderEndcallsgetAutoCommitEvent, which will
interrupt (i.e. pause) the automated request cycling.void resumeAutoCommit()
This method resets the auto-commit pause flag so that the auto-commit can resume.void onStopAutoCommit(Control, ArgumentList)
This event handler method handles theonStopAutoCommitevent, triggered client-side in
response to a client-side event triggered byonRenderEndand
getAutoCommitEventin response to the “stoppingAutoCommit” flag.
This method first calls thestopAutoCommitmethod to update internal
container state, then it calls thestoppingAutoCommitmethod to clear the
“stoppingAutoCommit” flag.
Protected Methods
boolean showConfirmPrompt()
Checks the user preference to determine whether the auto-commit confirmation prompt should be displayed.
Checked byonCommitChangesprior to launching an auto-commit.void inhibitConfirmPrompt()
Sets the user preference to prevent the auto-commit confirmation prompt from being displayed. This is
called byonReturnif the user has chosen to hide the confirmation prompt in the future.void startAutoCommit()
This method launches the auto-commit process. It is called fromonReturn
if the confirmation prompt was shown, or directly fromonCommitChangesif it wasn’t.void stopAutoCommit()
Called by theonStopAutoCommitevent handler described above, this method actually
updates the internal auto-commit mechanism state to prevent the auto-commit from continuing, as
is necessary in the case of validation or other errors. It sets the container page back to the
startpage, so that the contained component can be displayed instead of the
progress bar, at which point auto-commit cycling ceases.void stoppingAutoCommit(boolean)
Sets thestoppingAutoCommitflag.
Private Methods
Although private methods cannot be overridden, understanding them can provide useful context.
String getAutoCommitEvent
Determines which client-side event should be triggered, based on the current auto-commit flags
and container state.
Tips and Pitfalls
Trace Logging
Some of the Combo Container behavior can be observed by turning on the trace logging for
com.documentum.web.formext.Trace.COMBOCONTAINER using either TraceProp.properties
or tracing.jsp. The trace logging is minimal, but it’s still worth enabling.
Finish Button Visibility
The best way to drive the visibility of the Finish button is through the use of the canCommitChanges
method, which is hard-coded to return true in ComboContainer but can be overridden. It is
also possible to acquire the Finish button control and set its visibility directly, but this must be done
after updateControls is called, since it will reset the visibility based on the canCommitChanges
method.
Custom Value Propagation
As described earlier, the value propagation mechanisms found in the Combo Container framework only
work for certain controls — those that have getValue/setValue bean methods, and DateTime.
In order to propagate state not stored in such controls, it may be necessary to override some
of the value propagation and component lifecycle methods described above.
The onNextPage method can provide a useful place to identify controls whose values were not
propagated during an auto-commit and handle them appropriately. However, when implementing your own value
propagation that works during manual pagination as well as auto-commit, it is usually necessary to
override one or more of the lifecycle methods, such as updateStateFromRequest,
onControlInitialized, or onInit, in order to track the new component types
and propagate values from the previous component to the current one.
Remember that value propagation can be tested by enabling it explicitly in the Combo Container component’s
configuration. This makes it possible to observe and verify the value propagation behavior by manually
stepping through the components, rather than having to use auto-commit to trigger value propagation, which
can much more difficult to trace.
Note:
Use caution when overriding value propagation methods and behavior! Use logging judiciously in your
custom code to help trace event handlers and state changes.
Multi-Page Components
Think twice before using a multi-page component as your contained component.
The ComboContainer.onNextPage method is responsible for moving from one page of a component
to the next. This method inherits some behavior from WizardContainer.onNextPage, which
actually calls into the onNextPage method of the contained component. Ditto for onPrevPage.
It therefore appears to be feasible to customize the contained component to contain multiple pages itself —
multiple tabs, for example — and to use the onNextPage and onPrevPage hooks
to drive value propagation and auto-commit behavior.
This approach is certainly possible, but there are many hazards, due to the way the Combo Container
functions. The auto-commit methods drive an active cycling of client-side and server-side activity. This request
cycling is coordinated by the auto-commit state and methods, and it ensures full initialization of every
contained component page. Proper cycling depends on the way the pagination logic interprets return values
from methods such as hasNextPage, onNextPage, canCommitChanges, and the like.
Successful integration often requires careful engineering of the onNextPage method to enable proper
cycling through component pages without the auto-commit mechanism stalling. In rare cases, careful
customization of the auto-commit methods or manipulation of internal auto-commit state may be
necessary as well.
In some cases, it may even be necessary to override the auto-commit state changes in order to “fool” the
auto-commit logic into continuing to the next page or component as needed. Caution, testing, logging,
and a decompiler can be your friends in these situations.
Note:
If multi-page logic is necessary in your contained component, it should extend WizardContainer
if at all possible. Extensive testing is recommended regardless, as the auto-commit mechanism may not
play nicely with certain customizations.
Summary
The WDK Combo Container framework provides a flexible, extensible mechanism for driving multiple
instances of the same component in response to a multiselect action. Although customization can be
dangerous, with the right context and careful planning, the framework can be adapted to a wide array
of situations.
