HubSpot offers a lot of flexibility when it comes to allowing customizations within the platform, but it can be a bit overwhelming and confusing to know how to leverage the design tools that HubSpot provides. The series of articles to follow will help you get familiar with the different design tools that HubSpot offers and how you can utilize them to create a highly customized HubSpot implementation.
Are you ready to start fully utilizing HubSpot’s design tools? Unless you’re a HubSpot power user, you may not be aware that you develop components for HubSpot such as CMS Content, Themes, Marketing emails, Landing pages, Custom apps, etc. as you would in nearly any web app. HubSpot even gives the capability to develop these components locally with your favorite IDE and command line tools of choice, which as developers, makes us happy!
In this series, we’ll learn to connect our IDE (IE: WebStorm, Sublime, Atom, Visual Studio, Eclipse, etc.) with HubSpot so that you can develop your HubSpot components with the greatest level of flexibility, locally!
Let's Begin!
There are a couple of prerequisites you’ll need to be aware of:
- If you wish to create and manage your own CMS content within HubSpot, you must be a HubSpot CMS Hub Professional or Enterprise customer.
- If you wish to create and manage your own highly customized email templates, landing pages, etc. you must be a HubSpot Marketing Hub Professional or Enterprise customer. Not one of these? Contact us today and we will be happy to get you set up!
- We will need to install Node.js and a few other related components as required by HubSpot. This means you must have access to your computer’s command line interface, and you may also need administrator privileges.
- You must have an IDE of your choice installed on your computer, such as WebStorm, Sublime, Atom, Visual Studio, Eclipse, etc.
Here are the steps we’ll follow to get started with developing HubSpot components locally:
- Install Node.js and Version Manager.
- Switch to Node.js v12.x as HubSpot requires.
- Create your project’s working directory.
- Link your project to HubSpot CLI.
Install Node.js and Version Manager
First, we’ll need to make sure that you have Node.js installed along with NPM (Node Package Manager) and NVM (Node Version Manager). For this article, we will be setting up our environment using mac OS Monterey. If you are setting up your environment on a Windows machine, you will need to install Node.js in a different manner than described here. Here is a recommended read to be able to install Node.js on a Windows machine.
Our method of choice for installing Node.js on a Mac is to utilize Homebrew package manager. There are several other ways to install node, but this is considered the simplest method.
To start, make sure that Homebrew (further described as `brew`) is installed.
/bin/bash -c “$(curl -fsSL https://raw.githubusercontent.com/Homebrew/install/HEAD/install.sh)”
Follow the command prompts to proceed with installation of brew on your machine. Once you have brew available to you, you can go ahead and install Node.js
brew install node
Now, lucky for you, this should install both Node and Node Package Manager together. To verify, you should now be able to run node -v and npm -v to view the current versions of both node and npm installed. If this is not the case, with a bit of Googling it’s usually easy to troubleshoot where installation issues go wrong. Most often permissions are the culprit.
Switch to Node.js v12.x as HubSpot requires
You’ll then want to ensure you have Node Version Manager installed. This allows you to easily switch back and forth between version of Node.js depending on the project you’re working on. Many different types of Node applications require different versions. Specifically, HubSpot requires Node.js v12.x.
curl -o- https://raw.githubusercontent.com/nvm-sh/nvm/v0.39.1/install.sh | bash
After running this command, you’ll need to close your current terminal session and open a new one so that you can run the following command to verify your installation: nvm -v
To install and switch to the latest version of the 12.x series, use the following Node Version Manager commands.
nvm install 12
nvm use 12
If you already had nvm installed and had other versions of Node.js installed, you can be more specific with the version number in the previous commands. At the time of writing this article, the latest version of the 12.x series is 12.22.9, so you can instead use nvm install 12.22.9 and nvm use 12.22.9 if you wanted to get more specific with the version you’re running.
Create Your Project's Working Directory
Pick a directory on your machine that feels comfortable for you where you want to set up your HubSpot project. I set up all projects in ~/Sites/. So, I will create the directory for my project by running mkdir ~/Sites/hubspot-local-dev/ Once you’ve created your project directory, enter the folder by running cd ~/Sites/hubspot-local-dev/. You’re ready to get the HubSpot CLI installed. This is the last bit before proceeding with HubSpot local development.
npm install -g @hubspot/cli
The foundation has now been set to begin setting up your first HubSpot project! Congrats!
Link Your Project to HubSpot CLI
Let’s begin connecting our local development environment with HubSpot. From the command line within your project’s folder, execute the following command:
hs init
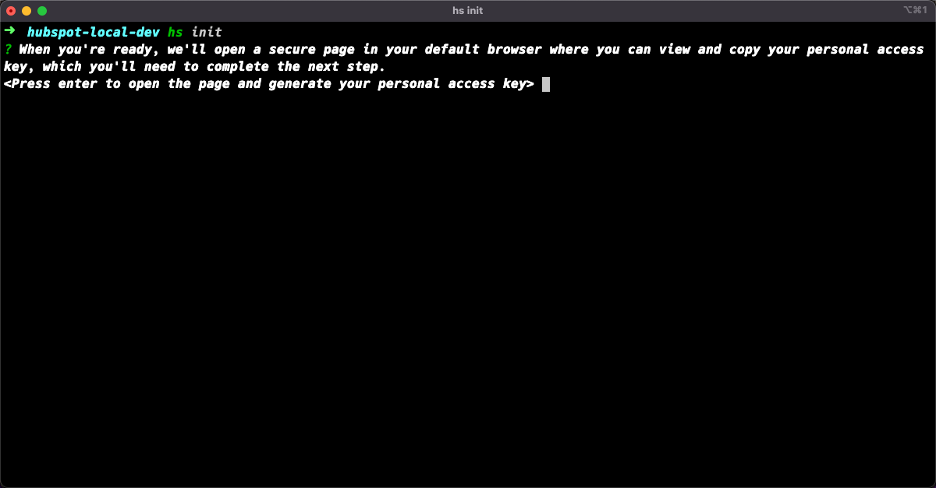
You’ll be prompted with the following:
When you’re ready, we’ll open a secure page in your default browser where you can view and copy your personal accesskey, which you’ll need to complete the next step.
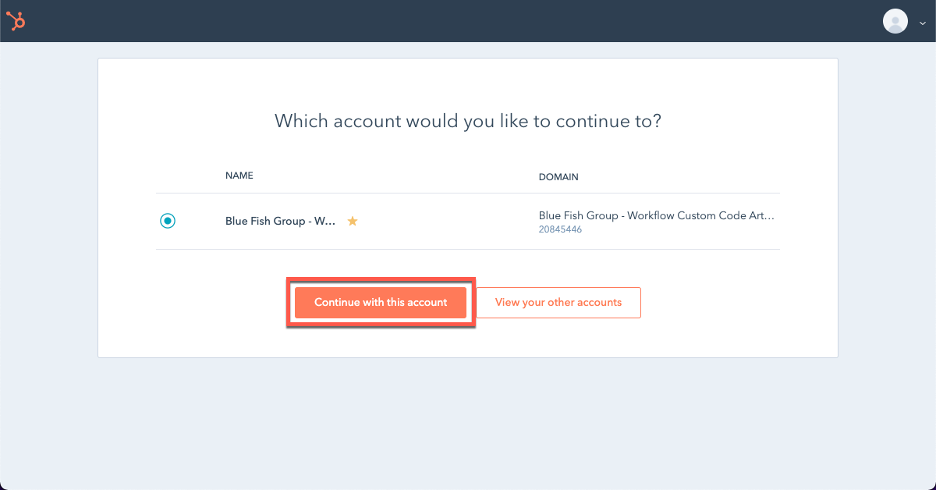
As suggested, press the “Enter” key. Your default browser will open and ask you to login to HubSpot. Once you have logged in, you will receive a page like the screenshot below that will ask you to select your HubSpot account to link with the HubSpot CLI. When selected, you can click the button “Continue with this account.”
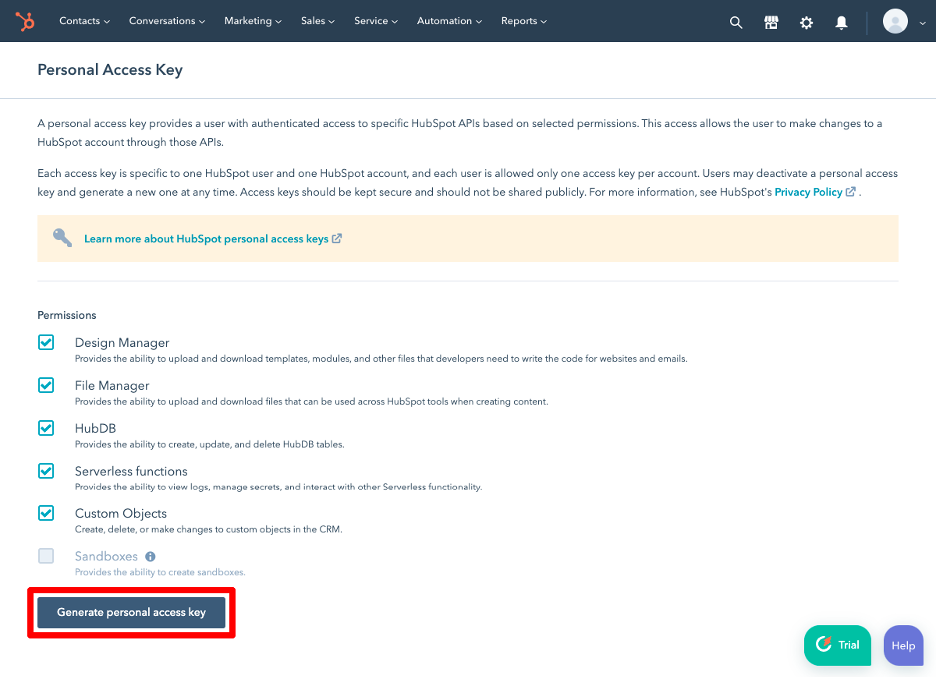
The next page will ask you which permissions you would like to allow for your local project. By default, all are selected. Select your permissions as suggested and click “Generate personal access key.”
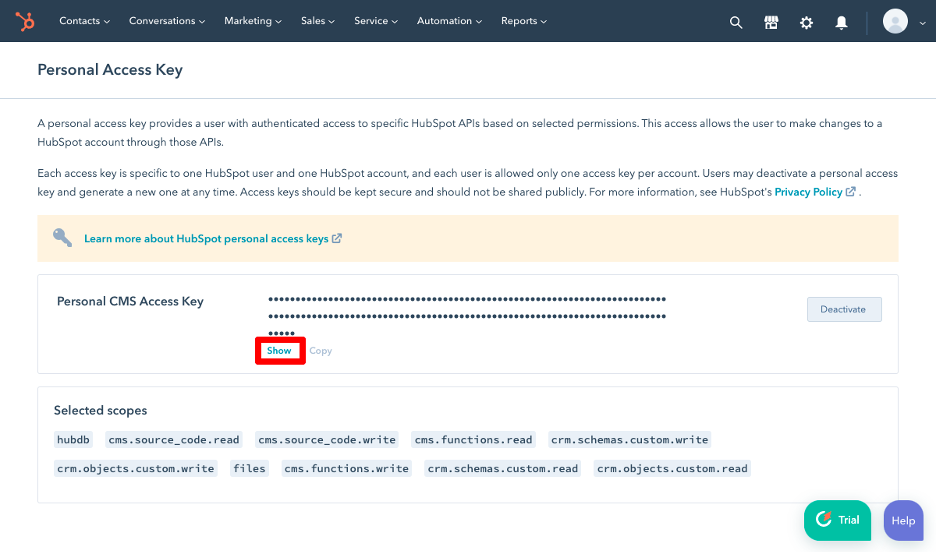
Hit the “Show” button and copy your Personal CMS Access Key somewhere safe to keep a copy of it.
With your Personal CMS Access Key still in your clipboard, you’ll need to paste it into the terminal window as shown:
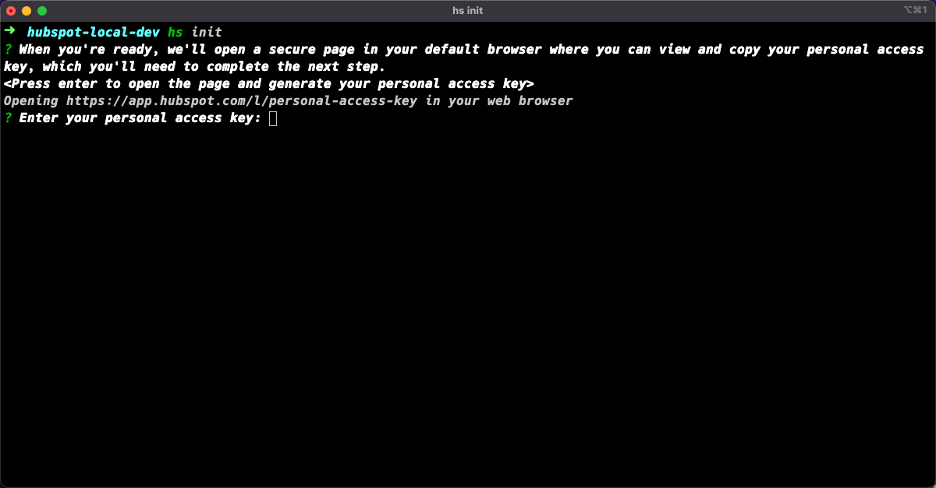
You’ll be prompted to provide a name to reference your HubSpot account. The name cannot contain spaces or special characters other than dashes and underscores. For my example, I will be using “hubspot-local-dev” (The same as the project directory I’m working in.)
A success message should appear letting you know that a config file hubspot.config.yml has been created in your current working directory that links HubSpot with your new project!
Now that we have a local development environment setup, in our next article, we will show you how to utilize Design Tools within HubSpot to be able to develop CMS content locally, HubSpot modules, highly customized marketing emails, etc.
We hope that this article has been helpful in providing you with the tools required to utilize all that HubSpot has to offer.
Any of this outside of your comfort zone? Would you rather partner with an agency that can help you customize and leverage HubSpot to its fullest extent? We’re always here to discuss the best approach for your project. If you have any additional questions, please don’t hesitate to reach out! We are always happy to help.


