We’re going to cover everything that’s needed for configuring Alfresco Identity Service as an identity broker to Okta via OpenID Connect (OIDC).
Why are we doing this? The Alfresco documentation for Identity Service is incomplete and, in some cases, even contradicts other documentation. Alfresco wrote a post about how to set up Identity Service but it’s years old and doesn’t really give enough specifics.
In this article, we’ll configure Alfresco Content Services (ACS), Alfresco Process Services (APS) and an Alfresco Development Framework (ADF)-based application to utilize Identity Service.
Multiple versions of ACS are supported by Identity Service but for this example, we’re using 6.2.2. Additionally, you’ll need to be using APS 1.9+ if you want to enable SSO for APS. Review Alfresco’s full list of supported platforms for Identity Service before setting things up.
Throughout this article, we’ll refer to URLs that map to the various components that make up this solution. These will be:
| Component | URL |
|---|---|
| Alfresco Identity Service | https://identityservice.argondigital.com |
| Alfresco Content Services | https://alfresco.argondigital.com |
| Alfresco Process Services | https://process.argondigital.com |
| Alfresco Development Framework App | https://adf.argondigital.com |
| Okta | https://argondigital.okta.com |
Let’s dive in.
Installing and Configuring Identity Service
Alfresco Identity Service is really just a skinned version of Red Hat’s Keycloak, with some default Alfresco-specific configurations included.
Identity Service includes a standalone JBoss server as well as an embedded H2 database so no additional components are needed in order to use it. Additionally, other Alfresco components like ACS are not required in order to utilize Identity Service.
While Identity Service can be configured as an identity provider (IdP), we’re going to walk through the steps to use it as an identity broker where the authentication can be delegated to an external IdP (in this case, Okta). The Alfresco documentation doesn’t make this type of set up entirely clear, so we’re going to spell out exactly what’s needed to make this work.
Identity Service does require that each user be provisioned within the Identity Service instance. This can be done manually or you can configure the service to connect to an LDAP store to sync users. If you’re syncing users, it’s expected that your IdP (e.g. Okta) also has the same users. For more information on this, refer to the section below on “User Set Up“. Note: you can configure Identity Service to provision users on their initial authentication – we’re not going to cover that set up in this post.
Installation Steps
Follow these steps to get Alfresco Identity Service up and running:
- Download the zip from Alfresco. In our case, we’re using Identity Service 1.6.0
- Extract the zip onto the server that will run Identity Service
- If you’re using Windows and want Identity Service to run as a service, you’ll need to use something like NSSM to get it up and running
- In our example, we’re using NSSM with the following parameters for the service:
- Path: %Identity Service Root%\bin\standalone.bat
- Startup Directory: %Identity Service Root%\bin
- Arguments: -Djboss.socket.binding.port-offset=100 (see section below regarding Identity Service port numbers)
- In our example, we’re using NSSM with the following parameters for the service:
- You can use the default port numbers with the Identity Service JBoss instance (8080 for HTTP, 8443 for HTTPS, 8009 for AJP (if you’re fronting with Apache)) but those may be reserved on the server you’re using. In that case, we’d suggest starting the JBoss server (either from the command line or as a service) using – “-Djboss.socket.binding.port-offset=100”. This will shift all ports by the offset specified. So, 8443 would become 8543. For this article, we’re using 100 as the offset so the port we’ll be using to access Identity Service is 8543
- Identity Service comes with its own embedded version of H2 that’s used for storing configuration data and user info. You can use an alternative relational database like Postgres or MySQL, if desired. For our set up, we’re using the embedded H2 database so no additional database configuration is needed
- Once you’ve set Identity Service to run as a service, go ahead and start it up. You can check the server logs at %Identity Service Root%/standalone/log/server.log
- Assuming the server starts up correctly, you can browse to the admin using e.g. https://identityservice.argondigital.com:8543/auth
- Identity Service ships with its own self-signed SSL certificate. As such, your browser will probably show a warning when attempting to access. For development/testing, it’s fine to trust this certificate but for a production environment, you’ll want to add your own certificate to the Identity Service keystore
- The default location for the Identity Service keystore is %Identity Service Root%/standalone/application.keystore
- We’d recommend adding your certificate to the OOTB keystore and giving it a custom alias (e.g. “my-keystore-alias”). If you do this, you’ll need to update the Identity Service server’s “standalone.xml” file (%Identity Service Root%/standalone/configuraiton/standalone.xml) to reflect this. There’s an “ssl” element under “server-identities” that would need to be updated similar to this:
<keystore path="application.keystore" relative-to="jboss.server.config.dir" keystore-password="password" alias="my-keystore-alias" key-password="password" generate-self-signed-certificate-host="localhost"></keystore>
The first time you access the admin, it will prompt you to create an admin username and password:

Configuring Identity Service
In order to use Identity Service as an identity broker, we need to set up a number of elements on the Identity Service server. We’ve broken down each of these into their own configuration section below:
Realm Configuration
Alfresco Identity Service ships with a default realm called “alfresco” (More details on realms here).
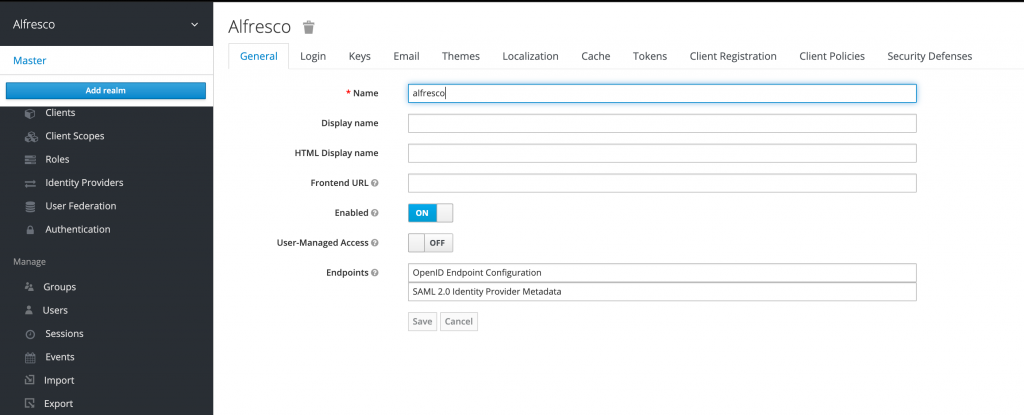
We suggest using the OOTB realm as it’s already configured for the type of set up we’re detailing in this post.
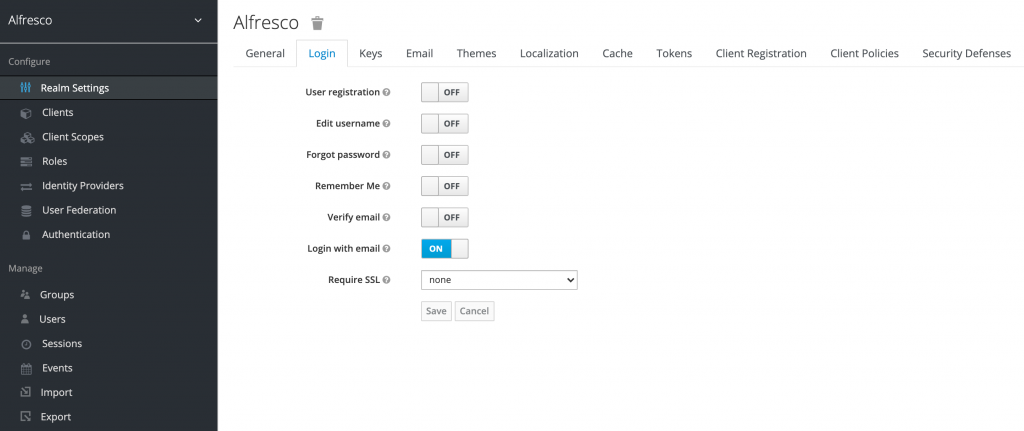
Also, make sure that “Login with email” is enabled under the “Login” section.
The remaining realm configuration can be left “as is” from the default configuration but review the settings to make sure they align with your organization’s guidelines.
Client Configuration
In Identity Service, you can create “client” entries for each of the applications that will leverage Identity Service for authentication and ticketing. In our example, we’ll set up clients for the following:
Alfresco Content Services Client
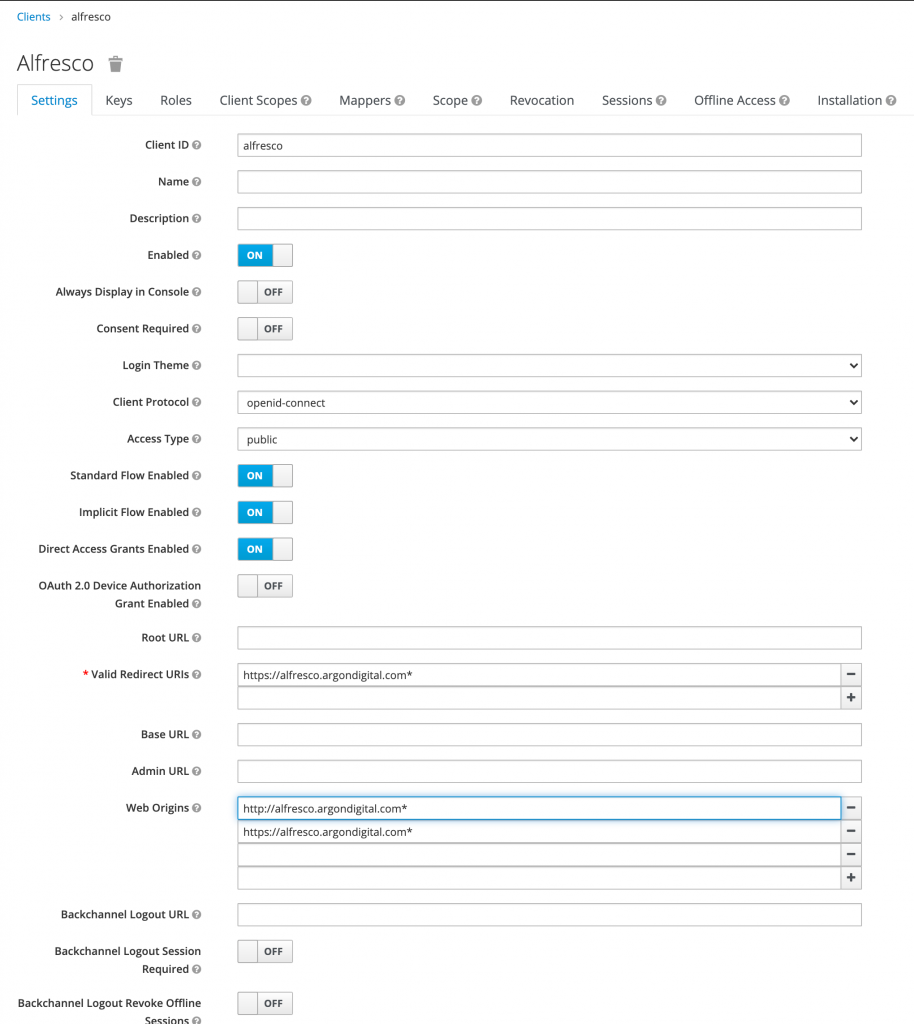
Out-of-the-box, Alfresco ships with a client called “alfresco”. Be sure that the settings for this client has *at least* the following set:
- Client ID – alfresco (note: you can use whatever ID you’d like here but you’ll reference this later so keep track of it. For this post, we’re sticking with “alfresco”)
- Enabled – on
- Client Protocol – openid-connect (this is the protocol that ACS will use to communicate with Identity Service)
- Access Type – public
- Standard Flow Enabled – on
- Implicit Flow Enabled – on
- Direct Access Grants Enabled – on
- Valid Redirect URIs – For development purposes, you can use “*” to indicate all URIs but in a production environment, you’d want this list to contain the URL(s) for your ACS repository (e.g. https://alfresco.argondigital.com*)
- Web Origins – List of hostnames that will be accessing Identity Service for the purposes of SSO. For development, you could use “*” but for production, this should be your ACS repository URL (e.g. https://alfresco.argondigital.com*)
Alfresco Share Client
If you’re using Alfresco Share and want to enable SSO, you need to define a client in Identity Service. To do this, click “Clients”, then the “Create” button in the upper-right:

For this client, you need *at least* the following set:
- Client ID – share (note: you can use whatever ID you’d like here but you’ll reference this later so keep track of it. For this post, we’re using “share”)
- Enabled – on
- Client Protocol – openid-connect (this is the protocol that Alfresco Share will use to communicate with Identity Service)
- Access Type – public
- Standard Flow Enabled – on
- Implicit Flow Enabled – off
- Direct Access Grants Enabled – off
- Valid Redirect URIs – For development purposes, you can use “*” to indicate all URIs but in a production environment, you’d want this list to contain the URL(s) for your Share server (e.g. https://alfresco.argondigital.com*) (note: we run Alfresco Share on the same server as ACS so the hostname is the same as the one we used in the “alfresco” client)
- Base URL – The primary URL people use to access Alfresco Share. In our example, this is https://alfresco.argondigital.com/share/
- Web Origins – List of hostnames that will be accessing Identity Service for the purposes of SSO. For development, you could use “*” but for production, this should be your Alfresco Share URL (e.g. https://alfresco.argondigital.com*)

Alfresco Process Services Client
If you’re using Alfresco Process Services 1.11+ and want to enable SSO, you need to define a client in Identity Service. To do this, click “Clients”, then the “Create” button in the upper-right:

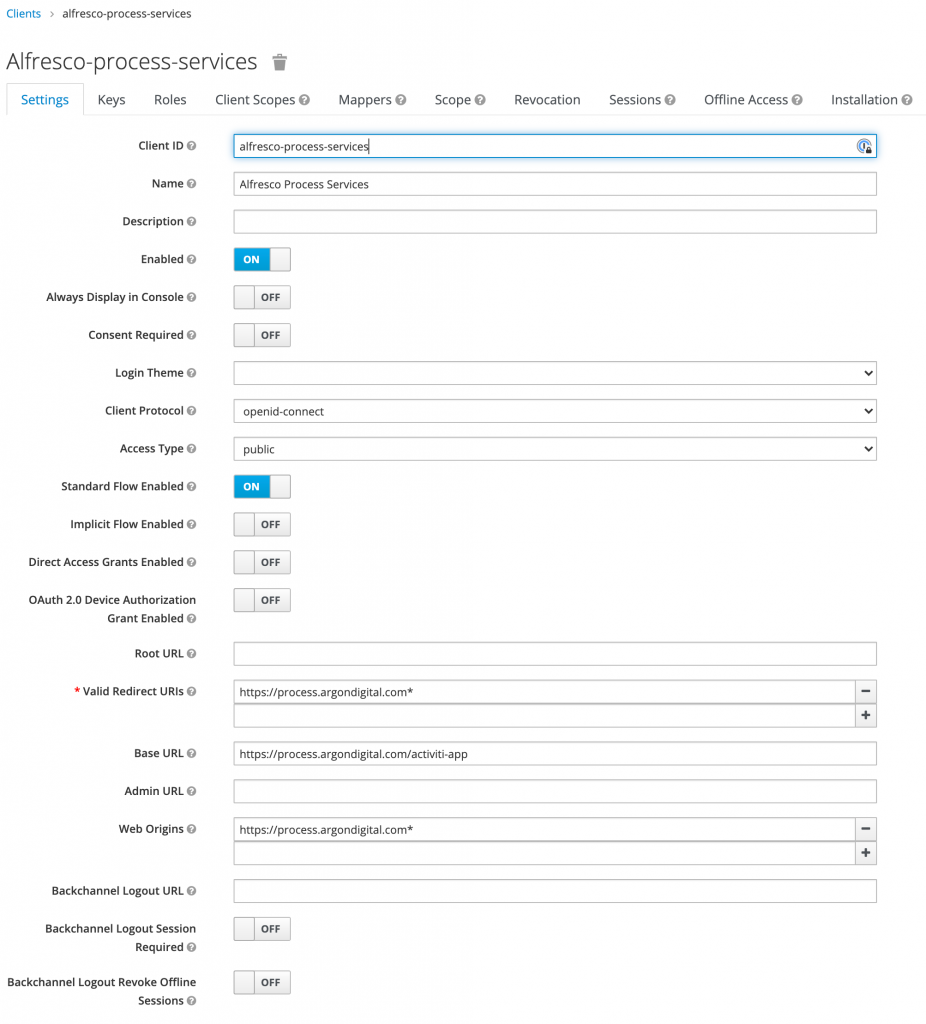
For this client, you’ll want *at least* the following set:
- Client ID – alfresco-process-services (note: you can use whatever ID you’d like here but you’ll reference this later so keep track of it. For this post, we’re using “alfresco-process-services”)
- Enabled – on
- Client Protocol – openid-connect (this is the protocol that APS will use to communicate with Identity Service)
- Access Type – public
- Standard Flow Enabled – on
Implicit Flow Enabled – off - Direct Access Grants Enabled – off (note: using the Activiti Admin? You’ll need to create a special configuration for this)
- Valid Redirect URIs – For development purposes, you can use “*” to indicate all URIs but in a production environment, you’d want this list to contain the URL(s) for your APS server (e.g. https://process.argondigital.com*)
- Base URL – The primary URL people use to access Alfresco Process Services. In our example, this is https://process.argondigital.com/activiti-app
- Web Origins – List of hostnames that will be accessing Identity Service for the purposes of SSO. For development, you could use “*” but for production, this should be your APS URL (e.g. https://process.argondigital.com*)
Alfresco Development Framework App Client
If you’ve built a custom ADF app (or if you’re using Alfresco’s Digital Workspace ADF app) and want to enable SSO, you need to define a client in Identity Service. To do this, click “Clients”, then the “Create” button in the upper-right:

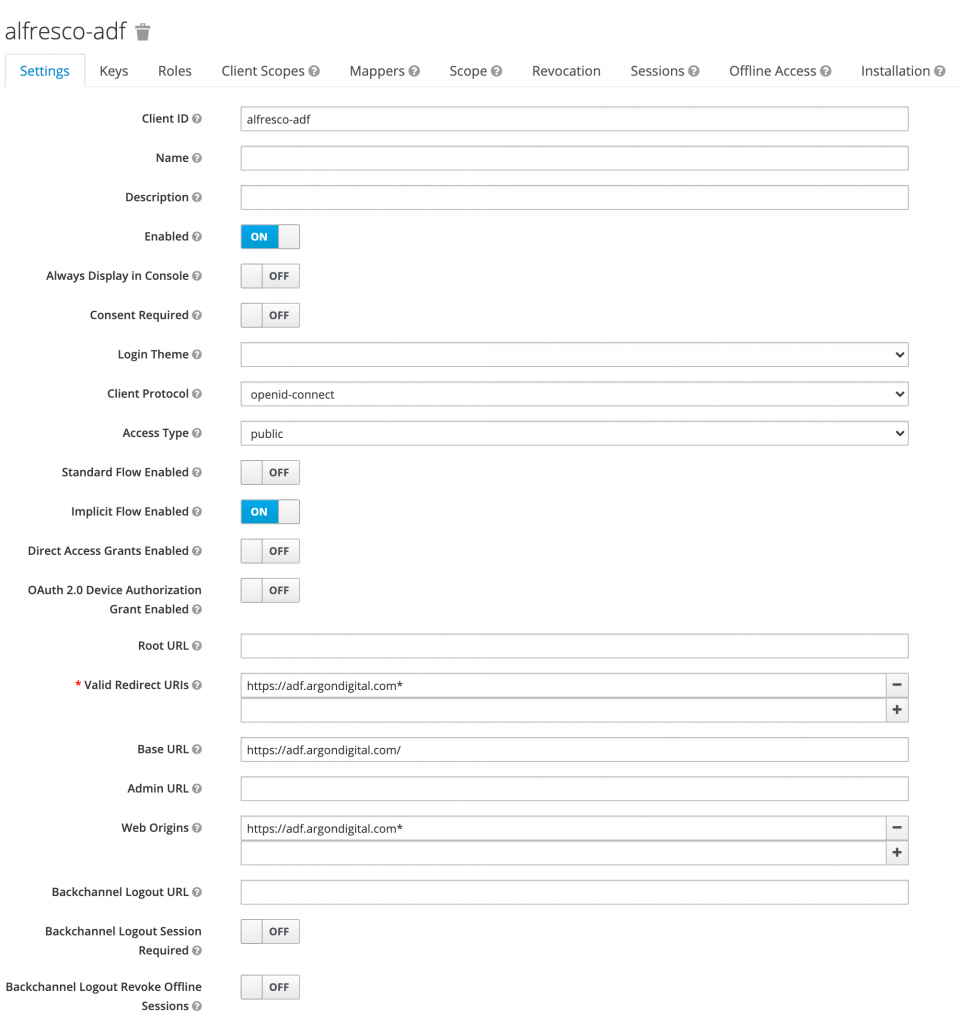
For this client, you need *at least* the following set:
- Client ID – alfresco-adf (note: you can use whatever ID you’d like here but you’ll reference this later so keep track of it. For this post, we’re using “alfresco-adf”)
- Enabled – on
- Client Protocol – openid-connect (this is the protocol that the ADF app will use to communicate with Identity Service)
- Access Type – public
- Standard Flow Enabled – off
- Implicit Flow Enabled – on
- Direct Access Grants Enabled – off
- Valid Redirect URIs – For development purposes, you can use “*” to indicate all URIs but in a production environment, you’d want this list to contain the URL(s) for your ADF app (e.g. https://adf.argondigital.com*)
- Base URL – The primary URL people use to access your ADF app. In our example, this is https://adf.argondigital.com
- Web Origins – List of hostnames that will be accessing Identity Service for the purposes of SSO. For development, you could use “*” but for production, this should be your ADF app URL (e.g. https://adf.argondigital.com*)
User Sync Configuration
In order for a user to authenticate in the set up we’re describing, a user account must be present in each of the following areas:
- In the appropriate Alfresco application (ACS and/or APS)
- In Identity Service
- In the IdP
Most of our client projects utilize LDAP for user data. As such, we’ll have all of the areas above syncing with LDAP. This avoids the need for setting users up manually in each system.
We won’t go into details in this post re: setting up LDAP sync in Alfresco products or the IdP.
In Identity Service, setting up a sync with LDAP is simple. Start by navigating to “User Federation” and choose “ldap” as the provider:

We’re not going to detail all of the settings for this provider as they will be specific to your set up, but these are the configurations that need to be set in order for users to appear properly in Identity Service:
- Enabled – on
- Import Users – on
- Periodic Full Sync (under “Sync Settings”) – on
- Full Sync Period – number of seconds before the next full sync run – this number is entirely up to you based on your needs
- Periodic Changed Users Sync (under “Sync Settings”) – on
- Changed Users Sync Period – number of seconds before the next changed sync run – this number is entirely up to you based on your needs
It’s also important to point out that in our example, we’re using email address as the user key between all of these systems. It is possible to use some other unique ID, but the details of such a configuration are outside the scope of this article.
If you’re setting up Identity Service in a dev or test environment, you can just set up users manually under the “Users” section of Identity Service. Note: you also need to set these users up manually in ACS/APS and the IdP if you don’t have those systems syncing with your LDAP store.
Authentication Flow Configuration
Identity Service comes with a few “authentication flows” OOTB. These flows define what should happen for the user when they attempt to authenticate to Identity Service (and, implicitly, to the configured Identity Provider if you’re using Identity Service as a broker).
In our set up, we want to make sure we’re using the IdP only to authenticate users that already exist in our Alfresco clients (e.g. ACS/APS) and have been created as users in Identity Service. We do not want Identity Service to automatically create these users if they successfully authenticate with Okta (i.e. the IdP).
To cover the scenario above, we’ll create a new authentication flow for the first time a user authenticates with the IdP. Here are the steps for doing this:
- Navigate to “Authentication” in Identity Service and click the “New” button

- For “Alias”, choose a name like “Alfresco – First Broker Login”
- For “Top Level Flow Type”, choose “generic”
- Hit “Save”
- Ensure that “Alfresco – First Broker Login” is selected in the authentication dropdown. Then hit “Add Execution”

- Under “Provider”, select “Detect Existing Broker User”
- Hit “Save”

- Hit “Add Execution” again
- Under “Provider”, select “Automatically Set Existing User”
- Hit “Save”

- On the main authentication screen for “Alfresco – First Broker Login”, make sure the “Requirement” radio buttons are selected, as follows:
- Detect Existing Broker User – Required
- Automatically Set Existing User – Required

The above authentication flow will ensure that only known users can authenticate with Identity Service. Additionally, the “Automatically Set Existing User” execution step will “link” the user in Identity Service with the IdP (which we’ll configure below).
The OOTB “First Broker Login” flow included with Identity Service has a number of steps that we don’t want for our particular needs. You can certainly use it if it can work for your organization, or you can create whatever authentication flows/executions are needed for initial logins.
Identity Provider Configuration
Now that we’ve configured the clients that will talk to Identity Service, we need to set up the Identity Provider (IdP) that Identity Service will use to authenticate users. This is where Identity Service is configured to function as an identity broker.
In our example, we’ll set up a new Identity Provider in Identity Service using OpenID Connect v1.0:
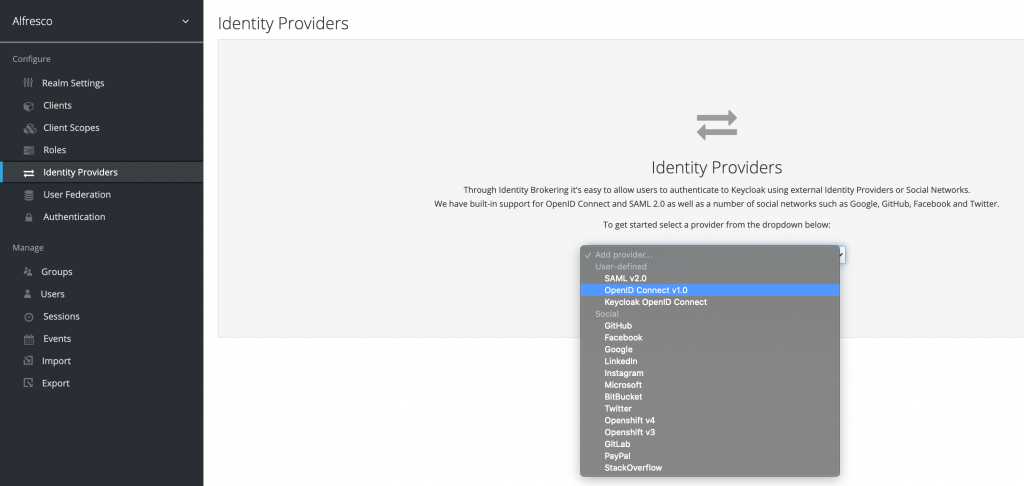
Note: the Alfresco documentation for Identity Service uses SAML for their configuration. While this is technically supported, we found it incredibly challenging to set up and opted for OIDC. We recommend using OIDC for simplicity if your IdP supports it.
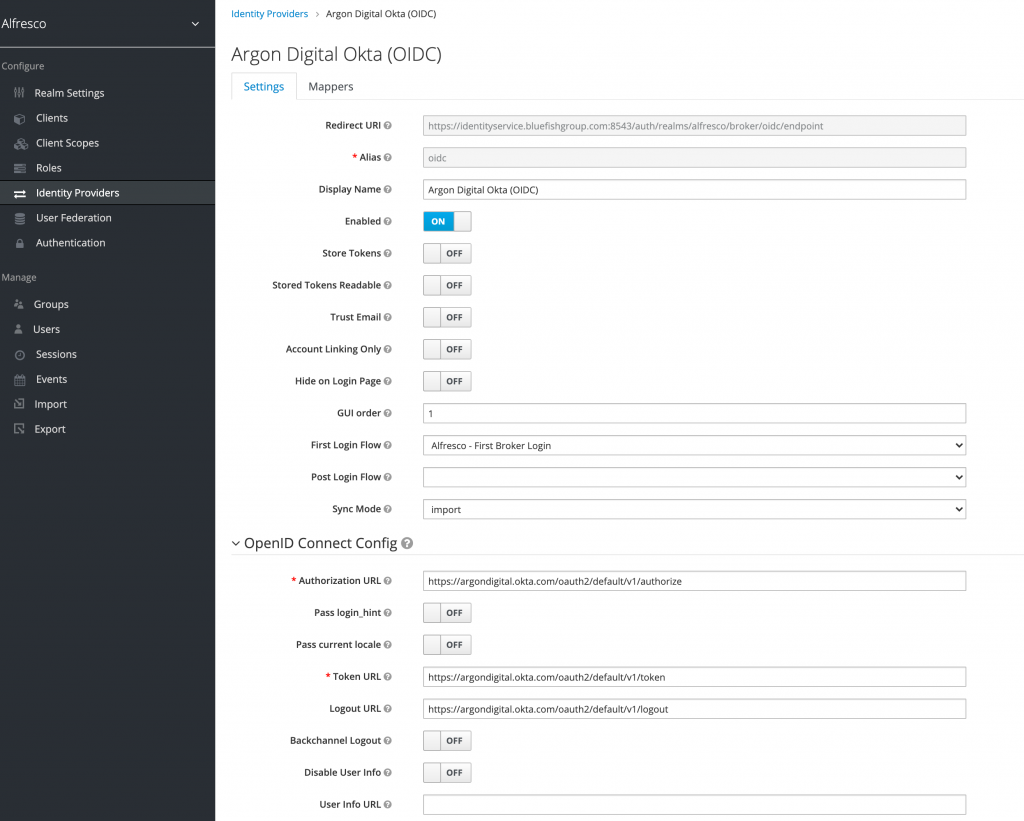
The following values should be used when configuring a new OIDC Identity Provider:
- Redirect URI – This value is automatically determined based on the URL you use to access the Identity Service server. Why does this matter? This will be the URL you set up in the IdP (see “Okta” section below). So, you want to make sure that you set up the Identity Service server exactly as you expect people to use it when they authenticate (e.g. make sure the port number is really what you want; if you’re fronting with Apache, use the URL without the port; make sure you’re using SSL, etc.)
- Alias – We’ll use “oidc” for our set up. Note: this alias is used elsewhere in our configuration and cannot be changed once you create the IdP entry in Identity Service (without setting the provider up from scratch again), so choose carefully
- Display Name – This is the name that’s shown throughout the Identity Service admin UI. You can change this value later, if desired
- Enabled – on
- First Login Flow – Use the “Alias” that we defined when we set up the Authentication Flow above. In our case, that’s “Alfresco – First Broker Login”
- Sync Mode – import
- Authorization URL – %Your organization’s Okta hostname%/oauth2/default/v1/authorize (In our set up, this is https://argondigital.okta.com/oauth2/default/v1/authorize)
- Token URL – %Your organization’s Okta hostname%/oauth2/default/v1/token (In our set up, this is https://argondigital.okta.com/oauth2/default/v1/token)
- Logout URL – %Your organization’s Okta hostname%/oauth2/default/v1/logout (In our set up, this is https://argondigital.okta.com/oauth2/default/v1/logout)
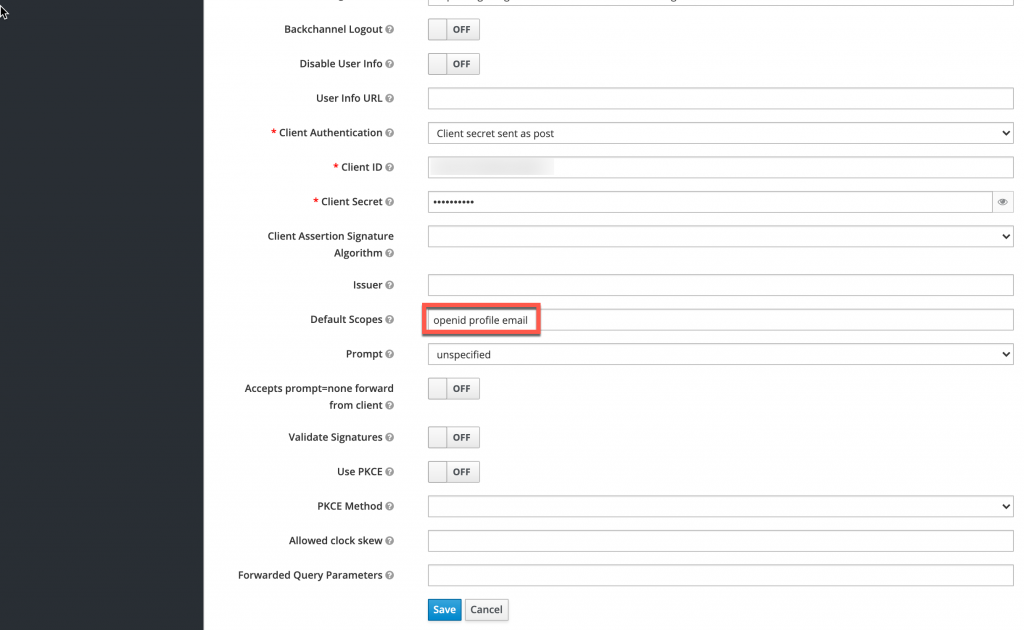
- Client Authentication – Client secret sent as post
- Client ID – Upon initial creation of the IdP entry in Identity Service, set this to a bogus value like 1234. We will circle back later in the set up in order to use the actual client ID from Okta
- Client Secret – Upon initial creation of the IdP entry in Identity Service, set this to a bogus value like 1234. We will circle back later in the set up in order to use the actual client secret from Okta
- Default scopes – openid profile email (note: this is really important. If you don’t do this, Identity Service won’t have access to the “email” field for the user in order to associate the user in Identity Service with the user in the IdP)
- Prompt – unspecified
- Hit “Save” to create the Identity Provider in Identity Service.
This completes all of the initial steps needed in Identity Service. Now it’s time to move on to the configurations needed in the IdP (i.e. Okta).
Okta
Okta will be used as our Identity Provider (IdP) in this set up. To do this, we’ll set up Identity Service as an “app” in Okta:
- Navigate to “Applications”->”Applications” in Okta and choose “Create App Integration”

- Choose “OIDC – OpenID Connect” as the “Sign-in method”
- Choose “Web Application” as the “Application Type”
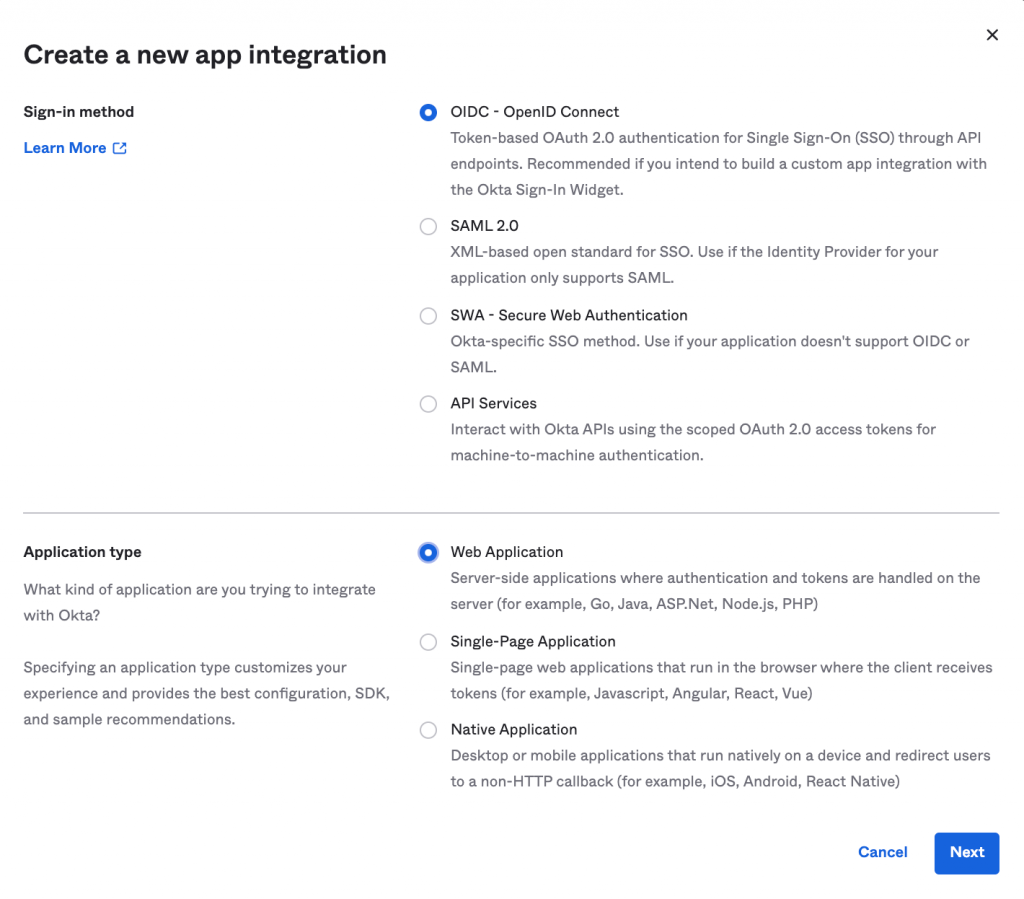
- Hit “Next”
- On the app details screen, enter the following values:
- App Integration Name – Alfresco Identity Service (you can really use whatever name you want)
- Under “Client acting on behalf of a user”, check:
- “Authorization Code”
- “Implicit (hybrid)”
- For “Sign-in redirect URIs”, add “https://identityservice.argondigital.com:8543/auth/realms/alfresco/broker/oidc/endpoint” (Note: this is the “Redirect URI” that appeared when we set up the Identity Provider in Identity Service above)
- It’s not necessary to specify a “Sign-out redirect URI”
- Under “Assignments”, choose the right access control for your needs. For development, this can be “Allow everyone in your organization to access”
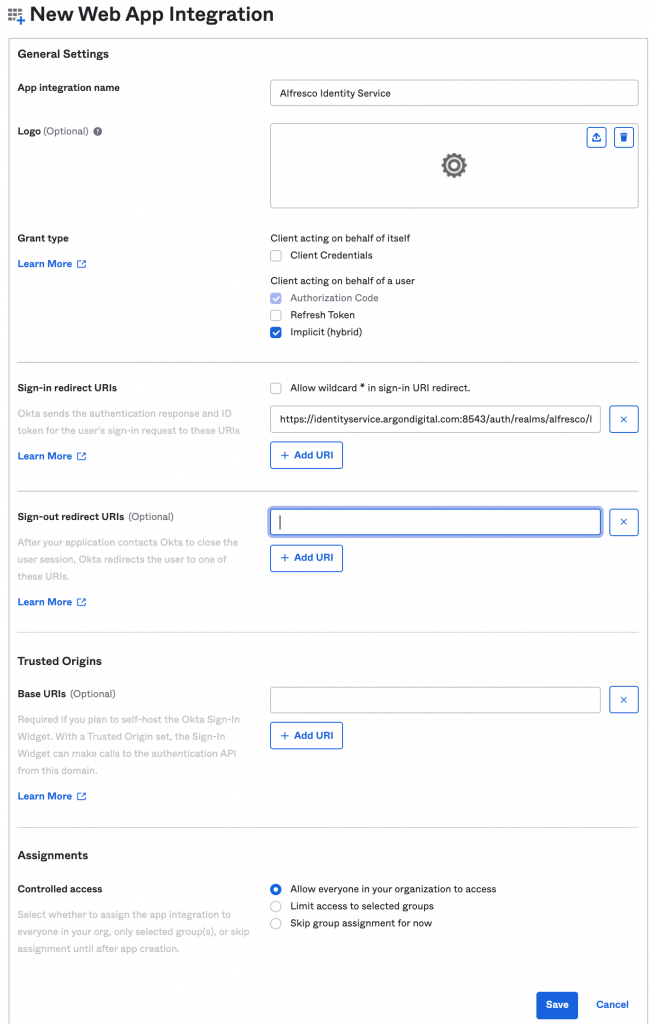
- Hit “Save”
- Once your Okta app is saved, a Client ID and Client Secret will be generated
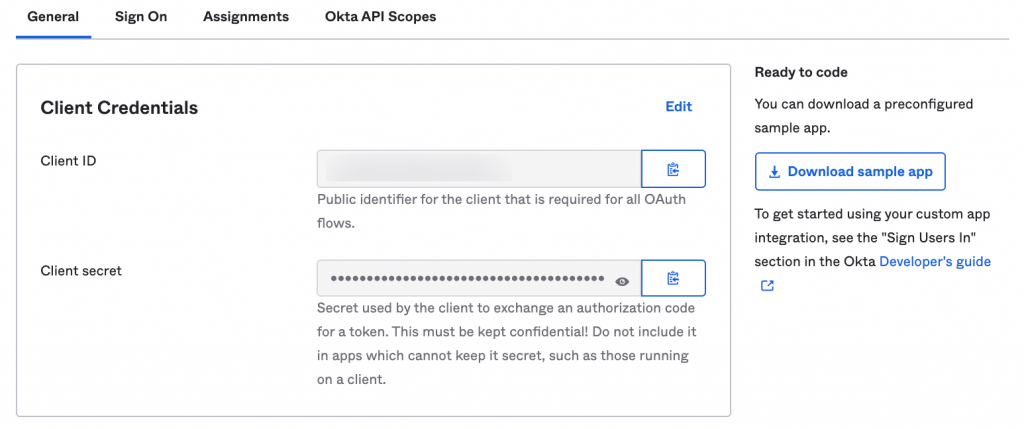
- Copy both the Client ID and Client Secret values
- Go back into the Identity Service admin UI and choose “Identity Providers”
- Find the Identity Provider you created above and choose “Edit”
- Update “Client ID” and “Client Secret” with the values that were generated from Okta for your app
- Hit “Save”
We’ve finished the initial set up of the Okta app for SSO. We’re now ready to configure our client applications.
Alfresco Content Services
In order for ACS to communicate with Identity Service, we need to make some adjustments to the Alfresco global properties file (i.e. /tomcat/shared/classes/alfresco-global.properties).
Add the following properties and their values:
					identity-service.enable-basic-auth=true
identity-service.authentication.defaultAdministratorUserNames=admin
identity-service.authentication.validation.failure.silent=false
identity-service.auth-server-url=https://identityservice.argondigital.com:8543/auth
identity-service.realm=alfresco
identity-service.resource=alfresco
identity-service.public-client=true
authentication.chain=identity-service-1:identity-service,alfrescoNtlm-1:alfrescoNtlm

csrf.filter.referer=https://alfresco.argondigital.com
csrf.filter.origin=https://alfresco.argondigital.com/*
A few notes on the above configuration:
- The “identity-service.realm” property should match the name of the realm you’re using in Identity Service. In our example, we’re using the OOTB “alfresco” realm
- The “identity-service.resource” property really means the “client” ID we used in the config. Again, if you’re using the OOTB client, this would be “alfresco”
- If you’re already using LDAP for authentication, you likely already have a property for “authentication.chain”. If that’s the case, be sure to add “identity-service-1:identity-service” as the first value in the value list. If you do not already have this property, you can use what we’re using above
- “csrf.filter.referer” and “csrf.filter.origin” are the URLs to your ACS repository server. Adjust those values accordingly
- Only ACS versions 6.1 and above support Identity Service. If you’re still on an older version of ACS, get more information on upgrading
A restart of ACS will be required in order for these values to take effect.
Alfresco Share
If you’ve done any digging online about setting up SSO for Alfresco Share, you’ve probably come across suggestions for enabling a number of CSRFPolicy evaluators in Share’s “share-config-custom.xml”. Those are NOT NEEDED in this configuration since we’re using OIDC to connect Alfresco Share to Identity Service (if you were using SAML to connect to Identity Service, these configurations would be necessary).
					<config evaluator="string-compare" condition="AIMS">
     <enabled>true</enabled>
     <realm>alfresco</realm>
     <resource>share</resource>
     <authserverurl>https://identityservice.argondigital.com:8543/auth</authserverurl>
     <sslrequired>none</sslrequired>
     <publicclient>true</publicclient>
     <autodetectbeareronly>true</autodetectbeareronly>
     <alwaysrefreshtoken>true</alwaysrefreshtoken>
     <principalattribute>email</principalattribute>
     <enablebasicauth>true</enablebasicauth>
 </config>
A few notes on the above configuration:
- The “realm” property should match the name of the realm you’re using in Identity Service. In our example, we’re using the OOTB “alfresco” realm
- The “resource” property really is the “client” ID we used in the Identity Service client config for Share. If you’re using the same values we’re using in this article, this would be “share”
A restart of the application server hosting the Share web app will be required in order for these changes to take effect.
Alfresco Process Services
APS 1.9+ fully integrates with Alfresco Identity Service.
To get APS SSO-enabled, you need to create a new file with the following path – \tomcat\lib\activiti-identity-service.properties. The contents of this file will be:
					keycloak.enabled=true
keycloak.realm=alfresco
keycloak.auth-server-url=https://identityservice.argondigital.com:8543/auth
keycloak.ssl-required=none
keycloak.resource=alfresco-process-services
keycloak.principal-attribute=email
# set to true if access type is public for this client in keycloak
keycloak.public-client=true
# set secret key if access type is not public for this client in keycloak
keycloak.always-refresh-token=true
keycloak.autodetect-bearer-only=true
keycloak.token-store=session
keycloak.enable-basic-auth=true
activiti.use-browser-based-logout=true

# Content services Identity service configuration
alfresco.content.sso.enabled=${keycloak.enabled}
alfresco.content.sso.client_id=${keycloak.resource}
alfresco.content.sso.client_secret=${keycloak.credentials.secret}
alfresco.content.sso.realm=${keycloak.realm}
alfresco.content.sso.scope=offline_access
alfresco.content.sso.auth_uri=${keycloak.auth-server-url}/realms/${alfresco.content.sso.realm}/protocol/openid-connect/auth
alfresco.content.sso.token_uri=${keycloak.auth-server-url}/realms/${alfresco.content.sso.realm}/protocol/openid-connect/token
alfresco.content.sso.redirect_uri=https://process.argondigital.com/activiti-app/app/rest/integration/sso/confirm-auth-request
A few notes on the above configuration:
- The “keycloak.realm” property should match the name of the realm you’re using in Identity Service. In our example, we’re using the OOTB “alfresco” realm
- The “keycloak.resource” property is the “client” ID we used in the Identity Service client config for Alfresco Process Service. If you’re using the same values we’re using in this article, this would be “alfresco-process-services”
- Once you enable SSO in APS, there is no way to authenticate into APS using an internal user (unless that user also happens to be set up in Identity Service and your IdP). So, if you use the “admin@app.activiti.com” OOTB account to manage APS, you’ll be unable to use that moving forward once SSO is on. Unfortunately, it does not appear that Alfresco has an “SSO bypass” URL. We’d recommend ensuring that at least one of your LDAP users is configured as an APS admin *before* making your SSO changes. If you forget to do this, you can set “keycloak.enabled=false”, restart APS, and you’ll be able to log in using the traditional login mechanism
A restart of the application server hosting the APS web app will be required in order for these changes to take effect.
Using Activiti's Admin App? Read On
If you’re using Alfresco Process Services, there’s a good chance you’re also using the standalone Activiti Admin app to monitor and manage APS workflows. The Activiti Admin app communicates with Process Services via the APS REST API. Within the Activiti Admin, a configuration option allows administrators to specify credentials for a user in APS that will be used to establish communication with the API. Typically, the user is created as a “service” type account in APS – i.e. the account exists solely for the purpose of the integration between APS and the Activiti Admin.
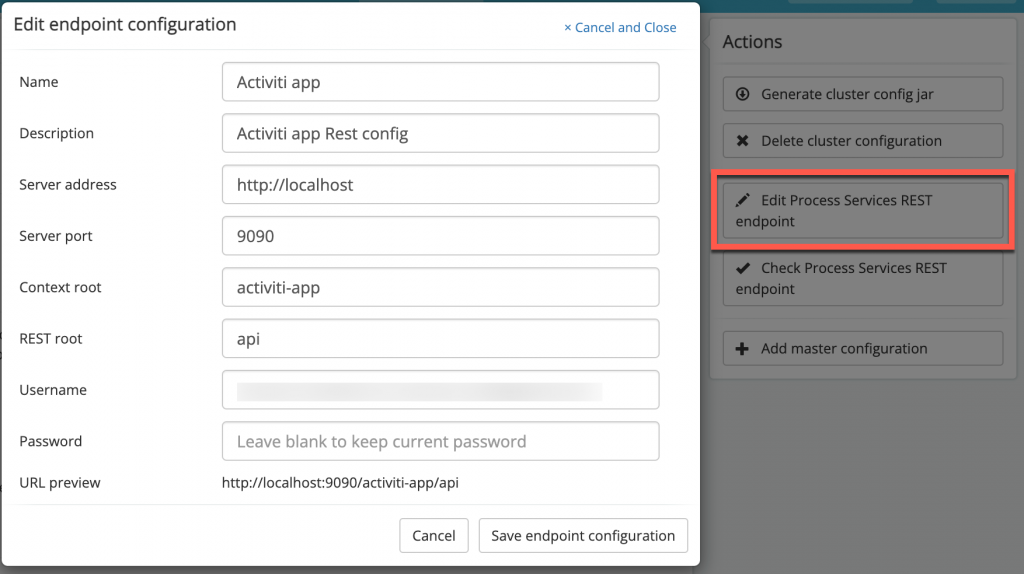
Unlike APS, the Activiti Admin application cannot be integrated directly with Identity Services. As a result, once APS is configured to use Identity Service, the Activiti Admin app will stop functioning properly since it will be unable to properly authenticate the REST API user that’s configured. Technically, APS is delegating authentication requests using the API to Identity Service – it no longer attempts to perform authentication for internal APS accounts like a service account.
Unfortunately, this specific set up isn’t covered in any of the Alfresco documentation. So, after much trial and error on this we eventually figured out what’s needed in order to allow the Activiti Admin to properly authenticate with APS while using Identity Service.
Here’s how this needs to be configured:
- A new internal user should be created in APS. We’ll call it “activiti-admin-service-account@foo.com”
- The newly added user should be placed into the APS “Superusers” group
- In Identity Service, a new user should be added to the directory. The username of this user should match the email address that was used in step 1 above
- The newly created Identity Service user should have “enabled” and “email verified” both set to true
- A password should be explicitly created for the user in Identity Service. This can be done under the “Credentials” tab for that user
- Within the APS Identity Service client configuration, “Direct Access Grants Enabled” must be set to true – Note: none of this will work without this setting
- In the Activiti Admin REST configuration settings, the email address used in step 1 should be specified as the username. The password should match what was specified in Identity Service for this user in step 5
With the above configuration in place, APS will delegate REST API authentication to Identity Service. It’s important to point out that this service user shouldn’t be in Okta – instead, this approach is leaving the authentication for this user up to Identity Service.
Alfresco Development Framework
Support for Identity Service has been available in the Alfresco Development Framework since 2.x, but for the purposes of this article, we’re using an ADF app that’s built on ADF 4.4.0.
You need the following configuration in your app’s “app.config.json” file:
					"authType": "OAUTH",
    "oauth2": {
      "host": "https://identityservice.argondigital.com:8543/auth/realms/alfresco",
      "clientId": “alfresco-adf",
      "scope": "openid",
      "secret": "",
      "implicitFlow": true,
      "silentLogin": true,
      "publicUrls": [
        "**/preview/s/*",
        "**/settings",
        "**/blank"
      ],
      "redirectSilentIframeUri": "https://adf.argondigital.com/assets/silent-refresh.html",
      "redirectUri": "/",
      "redirectUriLogout": "/logout"
    }
A few notes on the above configuration:
- Unlike ACS, APS and Share config, the ADF config doesn’t have a separate property for the realm name. Instead, it’s appended to the “host” URL (e.g. “/realms/alfresco”)
- The “clientId” property maps to the client ID that was used when setting up the client in Identity Service. In this case, “alfresco-adf”
- If your ADF app has additional public URLs that don’t require authentication, add them to the “publicUrls” array
- The “authType” property should be “OAUTH” in order for the ADF app to know to authenticate using Identity Service. If you want to turn off SSO temporarily, you can set that value to “ECM”
- Once you’ve enabled SSO for ACS and APS, your ADF app *must* also be configured for SSO. If you leave SSO off in ADF but on in ACS/APS, you’ll get authentication errors when attempting to log in via the ADF app
Other Things to Know
We picked up a few useful nuggets while getting Identity Service fully installed and configured:
- Despite what the Alfresco documentation seems to say, you do NOT need to install the SAML module in order for the above to work. Why? Share, APS and ADF are using OIDC to communicate with Identity Service, which then delegates to Okta via OIDC. At no point in this set up is SAML used (obviously, if your IdP doesn’t support OIDC, you’ll probably need to set SAML up but you should still be able to have the clients talk to Identity Service via OIDC and then Identity Service to IdP via SAML so in theory, the SAML module for Alfresco may not be needed)
- In the set up above, only one Okta app is created for Identity Service. In doing this, we can only have a single client “exposed” via that App in Okta. So, if you want your users to be able to access these clients directly from their Okta dashboard, you have to choose which client (and, thus, which redirect URL) to use. If you want each client to be available in Okta, you need to set them up as separate apps which means you also need to set up IdP entries in IS for each of those apps
- In the set up described above, we could front Identity Service with Apache httpd. This eliminates the use of port numbers (and opening holes in a firewall for said port numbers) when setting up the Identity Service app in Okta. We’re not going to detail this particular set up, but you can use AJP to connect Apache to the Identity Service JBoss server. Additionally, we would need to enable AJP in the Identity Service’s “standalone.xml” file by adding the following line directly under “”
<ajp-listener name="ajp" socket-binding="ajp"></ajp-listener>
Wrapping Up
Alfresco Identity Service is a key component for enabling SSO throughout your Alfresco-based applications.
Getting Identity Service up and running isn’t incredibly complex, but with the current state of Alfresco’s product documentation, it’s more challenging and confusing than it should be.
Hopefully this article clarifies what exactly is needed to get Identity Service running as an identity broker to an IdP like Okta using OIDC.
If you’re interested in learning more about Alfresco Identity Service or if you get stuck getting it up and running, feel free to drop us a line!


