

This article will provide a quick overview of the steps required to attach Eclipse as a debugger to an Alfresco environment. Once Eclipse has been attached to an Alfresco environment, it is easy to set up breakpoints in the Java code to assist with debugging efforts.
This example will be shown with Eclipse Kepler and Alfresco Enterprise 4.1.x; however, the same steps should be applicable to multiple versions of Eclipse and Alfresco.
To enable debugging, the Java Virtual Machine (JVM) exposes the Java Platform Debugger Architecture (JPDA). Several Integrated Development Environments (IDEs) support JPDA:
- Eclipse
- NetBeans
- IntelliJ
This article will focus on Eclipse, though any of the above IDEs should support JPDA.
To enable debugging, there are really only two steps required: 1) Enable Tomcat to listen as a server for incoming connections for debugging and 2) Create the remote debug configuration in Eclipse.
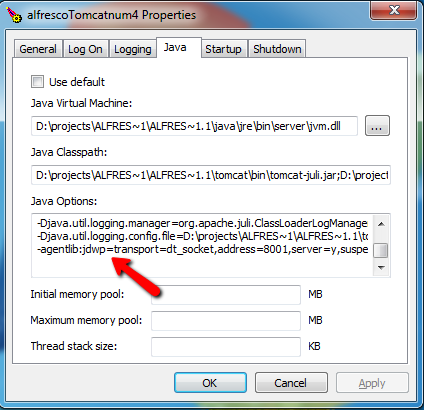
Configuring Tomcat to enable JPDA is straightforward, and just requires passing some parameters to the JVM. For Java versions 1.5 and higher, a parameter setting similar to the one below should be added as part of the JVM parameters for launching Tomcat:
- -agentlib:jdwp=transport=dt_socket,address=8001,server=y,suspend=n
In this example, we are telling the JVM to listen on port 8001 for incoming connections. In addition, we are specifying that it is the server, and that a client will be connecting to it. In addition, by setting “suspend=n”, we are not suspending Tomcat on the start-up of the debugger. We are telling it to continue running. The Eclipse debugger can be attached at any point after start-up, as needed. Setting the transport to ‘dt_socket’ allows for socket connections from remote clients.
A full, and very extensive, discussion of all of the potential options that one might choose here is available on the Oracle web site here:
Here is a full example of a potential set of “JAVA_OPTS” settings with the debugging setting enabled:
- -Xms512m -Xmx2048m -Xss1024k -XX:MaxPermSize=512m -XX:NewSize=256m -server -Dalfresco.home=/opt/alfresco-4.1 -Dcom.sun.management.jmxremote -agentlib:jdwp=transport=dt_socket,address=8001,server=y,suspend=n
On a default Linux installation of Alfresco, these settings typically reside in the ‘ctl.sh’ file that can be found here:
<ALFRESCO_INSTALL_DIR>/tomcat/scripts/ctl.sh
The debug parameter may be added to the “JAVA_OPTS” strings that are defined in that file.
For Windows users that start Alfresco via a service, the Service that starts Tomcat can be edited to add the parameter. For example:
- tomcat6w.exe //ES//alfresco
Once the JAVA_OPT settings have been updated, and Tomcat has been restarted, Tomcat will be ready to receive connections for JPDA clients.
To enable debugging from Eclipse, perform the following steps:
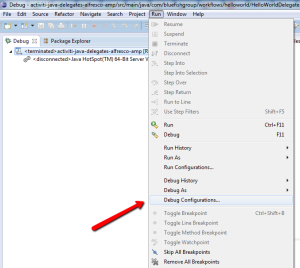
- Launch “Debug Configurations…” from the “Run” menu (see example below):
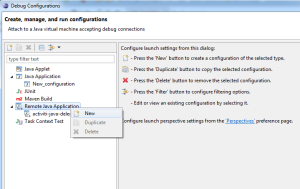
- Right-click on Remote Java Application and select “New”
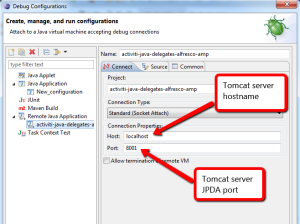
- Enter the information for the remote Tomcat server that Eclipse will connect to. The screen shot below provides an example:
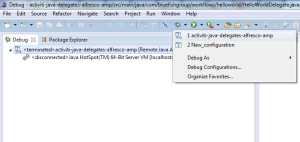
- Once this configuration has been saved, the debugger can be attached to Tomcat by selecting the configuration drop down from the “Debug” icon:
Once Debugging is initiated and Eclipse has connected to Tomcat, execution of code should stop at any breakpoints that have been set.

